In this document:
Introduction
An overview of how Admins, Team Members, and Customers can modify their booked appointments – such as Canceling, Rescheduling, Editing, and Deleting. Changing booked appointments can be performed in a variety of ways.
There are currently five different ways that a booked appointment can be changed:
- Appointment Details Page
- Notification link
- Confirmation screen
- Google Invite
- Upcoming Appointments module
Team Members also have a detailed look at how to manage their appointments in our Viewing Team Bookings guide.
Create a Custom Page to Edit Appointments
By default, we provide a blank page to host the Edit Appointments module. You can change the page this is hosted on by creating a custom Edit Appointments page.
Appointment Details Page
Applies to Admins and Team Members.
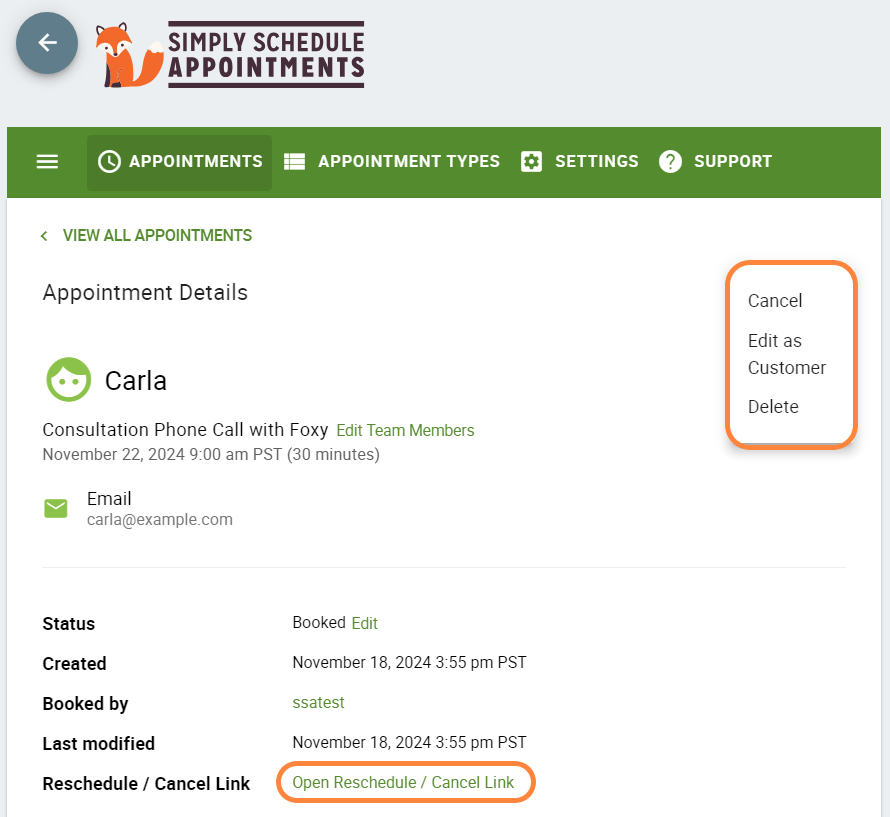
To change booked appointments as an Admin or Team Member, go to the SSA Admin Appointments Page > Appointments tab. Here you can see a list of your Upcoming Appointments.
Click on the Appointment you’d like to Cancel or Delete and click the Appointment Details page.
You can Cancel, Edit, Reschedule, or Delete the Appointment using the Menu (three dots) button in the top-right corner.
Canceling and Deleting Appointments
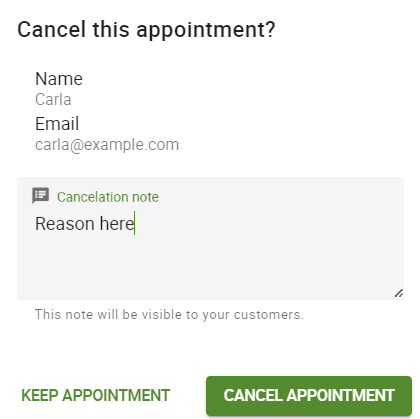
Canceling an appointment can trigger cancellation notifications if any are set up in your Notification settings.
Deleting only removes the appointment from your Appointment listing. It won’t trigger any notifications.
- You can only Delete past Appointments
- You can Cancel or Delete future Appointments
Cancelation Notes
You can also include a Cancelation note when canceling the appointment.
We also offer Cancelation Twig codes so you can add them to your emails, and it’ll automatically show the users who canceled the note and the note itself.
To show the note to the customer, simply add the following Cancelation Twig codes to your notifications.
Rescheduling and Editing Appointments
When you choose Edit, you’ll see the booking form, and you’re able to edit all the fields.
To reschedule an appointment, choose the ‘Edit as Customer’ option in the dropdown. This will open a lightbox that gives you three options: Reschedule, Edit or Cancel.
When you choose to Reschedule, the booking calendar for that appointment type opens, and you can choose from any available time slots.
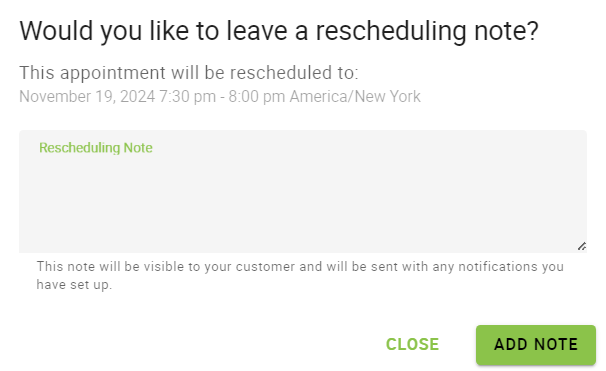
Rescheduling Notes
The admin and Team members (with permission) can now leave a note when rescheduling.
To show the note to the customer, simply add the following Rescheduling Twig codes to your notifications.
As for the Admin and Team members, it’ll only show when pressing on the Open Reschedule / Cancel Link link for that appointment.
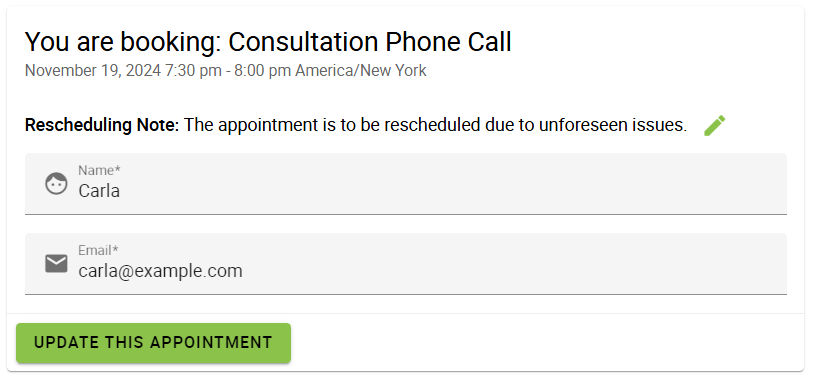
After pressing the Reschedule button and selecting the new Date and Time, a pop-up will show up asking if you want to add a rescheduling note for the client.
Now after pressing the Add Note button, you’ll have the option to either edit the note or go ahead and finish up by pressing the Update This Appointment button.
Modifying Booking Status
Admins can modify the booking status directly to your preferred status.
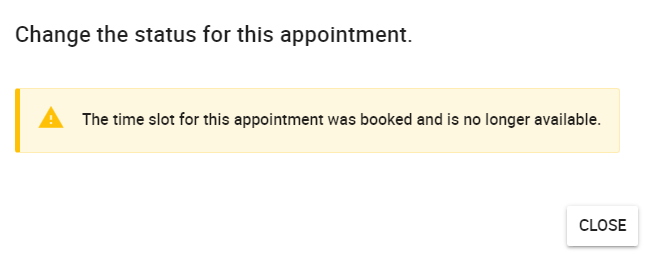
When marking Canceled and Abandoned appointments as Booked, it will display a notification if the time slot is no longer available and will prevent you from marking the appointment as Booked. This, in turn, will prevent double-booking from occurring.
This also applies to appointment types utilizing the Capacity feature. If the capacity is full, and you’re trying to mark a Canceled or Abandoned appointment as Booked for the time slot that’s full, it will warn you about this.
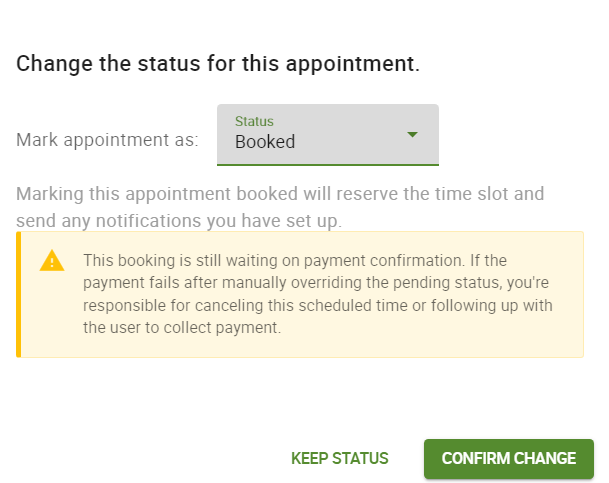
Modifying Pending Payment And Abandoned Status
If you’re using the Payments feature, the Appointment Details page will allow you to modify the appointment status from Pending to Booked or Abandoned.
In addition, an Abandoned appointment can only be marked as Booked.
Learn more about Managing Payments for Bookings.
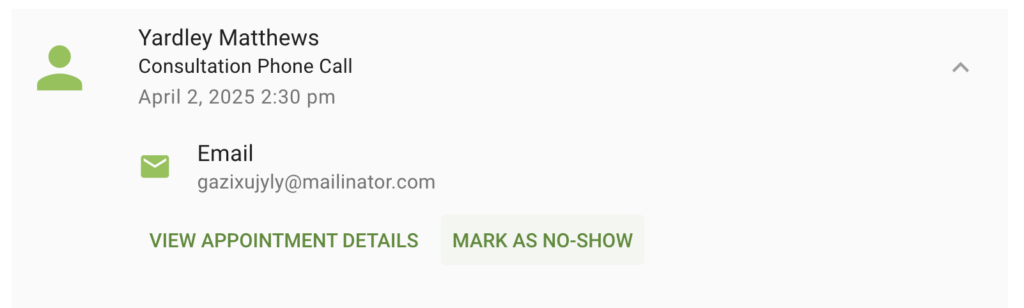
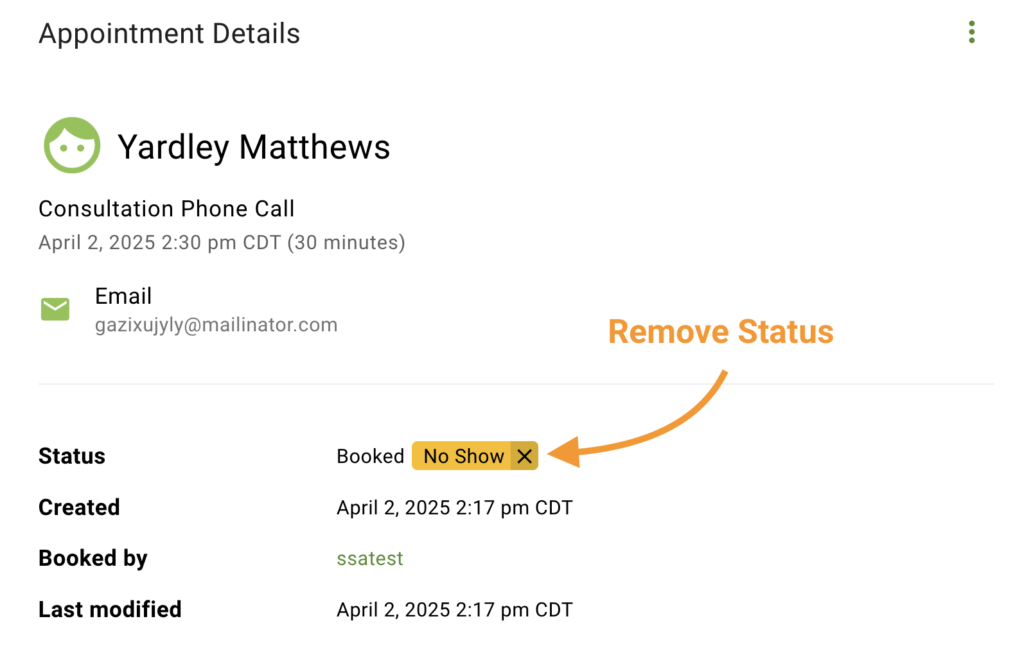
Modifying No-Show Status
After an appointment’s start time passes, you can edit the booking’s status to No-Show. You can change it from the Appointment listing or from the Appointment Details Page.
To remove the No-Show status, go to the Appointment Details page and hover over the yellow tag and click on the X.
Editing Team Members
If you’re using the Team booking feature, the Appointment Details page will allow you to Edit Team Members assigned to the current appointment.
Learn more about Editing Team Bookings.
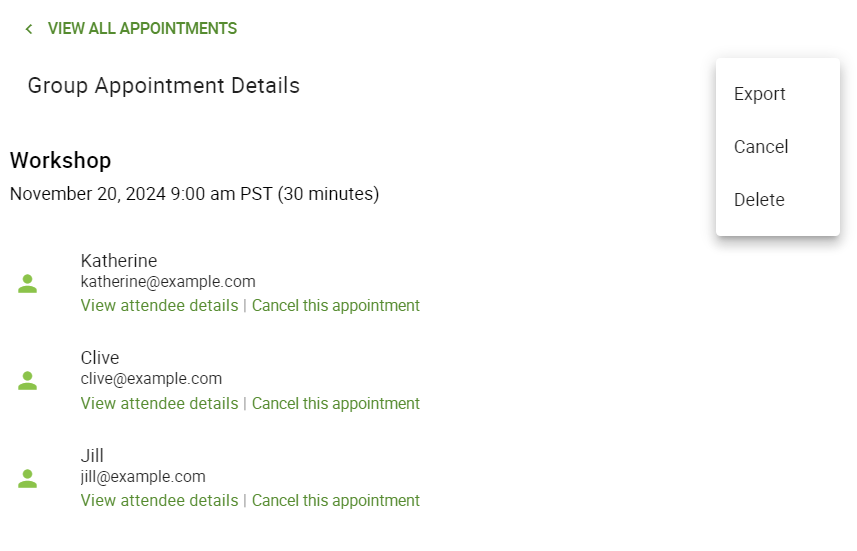
Managing Group Appointments
The Group booking feature is included in all of the paid editions using the Capacity feature.
The Menu (three dots) in the top-right corner will give you the option to:
- Export all the attendees
- Cancel the entire Group appointment – all attendees can get notified if you have cancellation notifications setup
- Delete the entire Group appointment – remove the listing from the Appointments page.
You’ll also see a list of attendees listed with their Name, Email, Appointment Details link, and Cancelation link. Changing booked appointments can also be done by canceling, rescheduling, deleting, or editing each individual attendee with their Appointment Details link.
Cancel/Reschedule Screen
Applies to Customers.
The default notification message customers receive includes a link to Cancel/Reschedule their booked appointment.
When customers click the link, they’ll have the options to:
- Edit Information: Returns the customer to the customer information screen to edit their booking form (name, email, etc.)
- Reschedule: Lets the customer select a new date and time. After picking a new date, the plugin cancels the old date and time automatically
- Cancel Appointment: Lets the customer cancel the appointment

You’re also able to create a custom page for the same purpose.
You can hide the Edit Information, Reschedule, Cancel Appointment, or all buttons from the Cancel/Reschedule screen.
Make sure to add the CSS in SSA Settings > Styles > Custom CSS field. If you’d like to learn more, see our guide on adding custom CSS to Simply Schedule Appointments.
This screen can also be accessed by any of the following sections.
Notification Link
Applies to Admins (If added), Team Member (If added), and Customers.
The default confirmation email for the customer contains a link to Edit, Cancel, or Reschedule their Appointment. Each link is unique to the booked appointment.
When you click the link, you’ll see a screen that looks very similar to the appointment confirmation screen with three options at the bottom.
- Edit Information: Returns the customer to the customer information screen to edit their booking form (name, email, etc.)
- Reschedule: Lets the customer to select a new date and time. After picking a new date, the old date and time cancel automatically
- Cancel Appointment: Lets the customer cancel the appointment
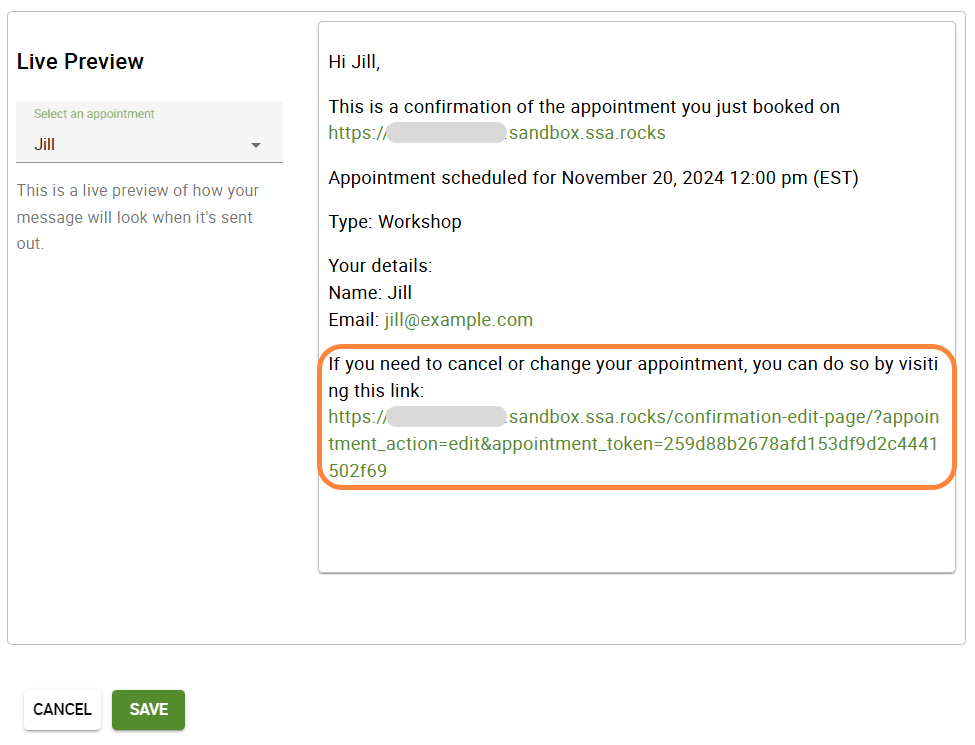
Notification link for admins and team members
An Admin or team member could also add this link to their confirmation emails by adding the Twig Code Template to their notification:
{{ Appointment.public_edit_url }}Admins get an additional button to View As Admin on the Edit Appointment page so that they can open the appointment details page directly.
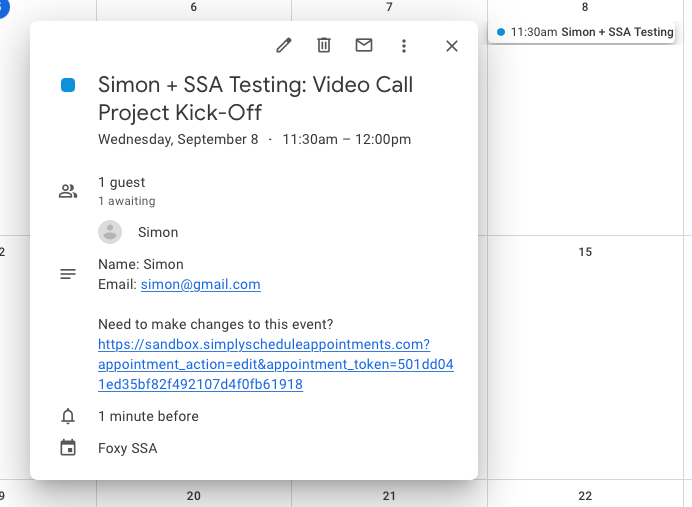
Google Invite
Applies to Admins, Team Members, and Customers (If added).
If you have the Google Invites feature turned on, the admin, customer, and team members will have access to the link to Edit, Cancel, or Reschedule from the appointment’s Google Calendar Event.
The Google Calendar Event shows the link under “Need to make changes to this event?“.
You can customize your Google Calendar events to include or exclude the link.
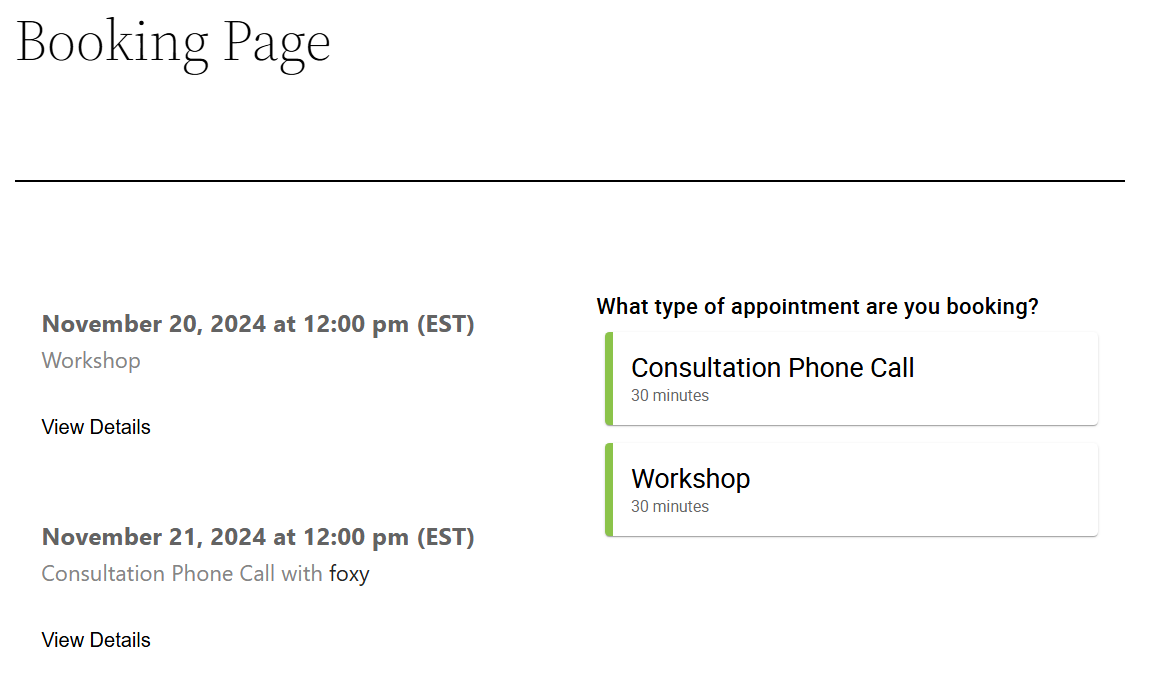
Upcoming Appointments Module
Applies to Customers.
If your customers have an account on your website, you can embed the Upcoming Appointments module into their profile page. This will list their booked appointments and allow them to edit each one individually. Changing booked appointments can be done by clicking View Details.
This is for customers only; this is not a way for admins or team members to see their booked appointments through the front end.
Confirmation Screen
Applies to Customers.
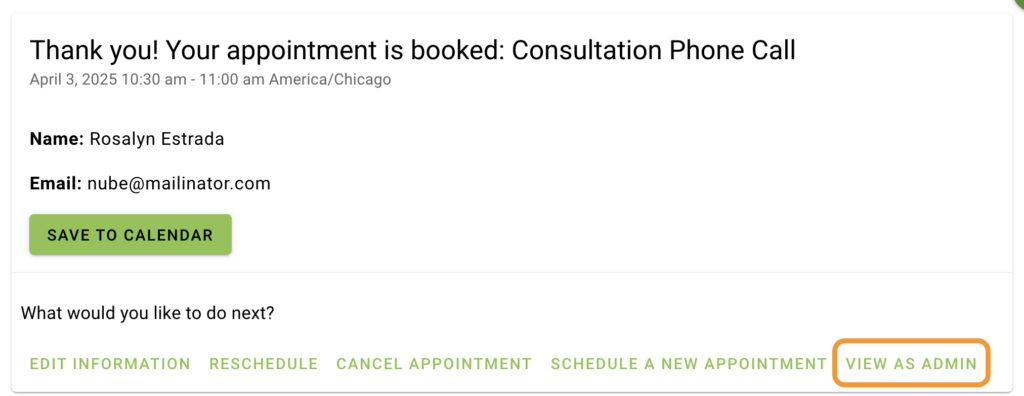
When a customer gets to the booking Confirmation screen, they’ll see four options available at the bottom of the screen.
Customers will be able to:
- Edit Information: Returns the customer to the customer information screen to edit their booking form (name, email, etc.)
- Reschedule: Lets the customer select a new date and time. After picking a new date, the plugin cancels the old date and time automatically
- Cancel Appointment: Lets the customer cancel the appointment
- Schedule a New Appointment: Takes the customer back to the initial screen to book an entirely new appointment
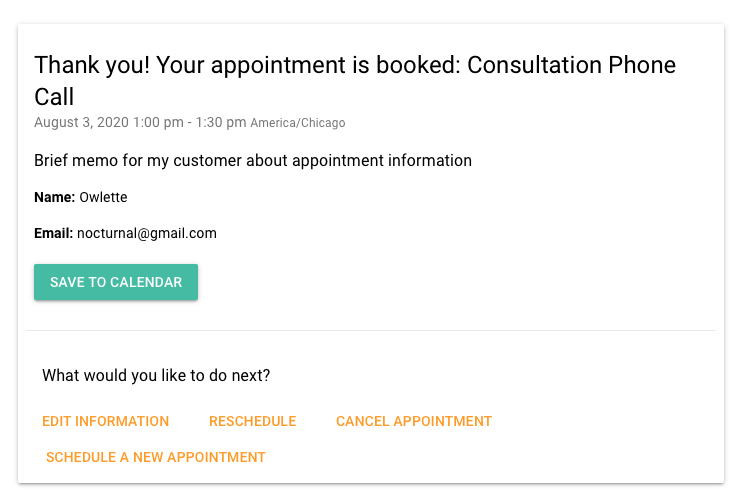
You can hide the Save to Calendar, Edit Information, Reschedule, Cancel Appointment, Schedule a New Appointment, or all buttons from the Confirmation Screen.
Make sure to add the CSS in SSA Settings > Styles > Custom CSS field. If you’d like to learn more, see our guide on adding custom CSS to Simply Schedule Appointments.
Related Guides
-

Searching, Filtering, and Viewing Bookings
-
Export Bookings to CSV
-
Email Notifications
-
Google Invites