In this document:
- Introduction
- Basic Twig Code Templates to Copy and Paste
- Customer Name
- Admin Email
- Appointment Type Name
- Customer Email
- List of All the Customer Information Fields
- Appointment Type Instructions
- Appointment Type Labels
- Link to Edit, Cancel, or Reschedule the Appointment
- Send Rescheduling and Cancelation Notes
- Appointment Date and Time
- Rescheduled Appointments
- Attendee List
- Your Website URL
- The Customer Booking URL and Page Title
- Payment Information
- Add to Calendar Links
- Team Members
Introduction
The Notification Subject and Message fields use Twig Code Templates. These help you automatically add in information from each appointment.
This guide will help you personalize your Notifications to make each customer feel like you wrote them especially for them. And, if you’d like to start with a base message, use our Default Notification Templates.
Visit our other guide for Advanced Twig Templates to further customize your notifications.
Basic Twig Code Templates to Copy and Paste
The following Twig Code Templates don’t need to be tweaked; just copy and paste them into your notification subject and message.
Customer Name
Collected from the Booking Form Name field:
{{ Appointment.customer_information.Name }}OR
{{ customer_name }}Admin Email
Collected from the Admin Email field inside General Settings:
{{ admin_email }}Appointment Type Name
Collected from the Name field inside Appointment Type Settings > Basics tab:
{{ Appointment.AppointmentType.title }}Customer Email
Collected from the Booking Form Email field:
{{ Appointment.customer_information.Email }}OR
{{ customer_email }}List of All the Customer Information Fields
Collects and lists out all the customer information fields used in the Booking Form:
{{ Appointment.customer_information_summary }}Appointment Type Instructions
Collected from the Instructions field inside Appointment Type Settings > Basics tab:
{{ Appointment.AppointmentType.instructions }}Appointment Type Labels
Send the appointment’s associated Appointment Type Label information.
Appointment Type Label Name
{{ Appointment.AppointmentType.label_name }}Appointment Type Label Color
{{ Appointment.AppointmentType.label_color }}Link to Edit, Cancel, or Reschedule the Appointment
To send the unique link to edit, cancel or reschedule the appointment, anyone with access to this link can make changes:
{{ Appointment.public_edit_url }}Pretty link
Display a custom message in place of the rescheduling link; replace the text “Reschedule or Cancel Here” with anything you’d like.
{{ Appointment.public_edit_url | link('Reschedule or Cancel Here') }}Send Rescheduling and Cancelation Notes
Leave user notes on why the appointment was Rescheduled or Canceled
Check our Cancel, Reschedule, Edit, or Delete Bookings guide to know how the rescheduling/canceling notes work.
Add the Name of the Admin or team member who Rescheduled and Canceled, respectively
{{ rescheduled_by_name }}{{ canceled_by_name }}Display the Rescheduling or Cancelation Note, respectively
{{ rescheduling_note }}{{ cancelation_note }}Appointment Date and Time
Display the Date and Time in the Admin’s/business timezone
{{ Appointment.business_start_date }}Display the Date and Time in the customer’s timezone
{{ Appointment.customer_start_date }}Rescheduled Appointments
Display Previous Appointments in Business Timezone
{{ Appointment.business_prev_start_dates }}Display Most Recent Previous Appointments in Business Timezone
{{ Appointment.business_prev_start_date }}Display Previous Appointments in Customer’s Timezone
{{ Appointment.customer_prev_start_dates }} Display Most Recent Previous Appointment in Customer’s Timezone
{{ Appointment.customer_prev_start_date }} Display Rescheduled Appointment Information Only if Rescheduled
{% if Appointment.customer_prev_start_dates is not null %}

This appointment was rescheduled from the following dates:

{{ Appointment.customer_prev_start_dates }}

{% endif %}
Attendee List
The list of attendees in a Group appointment
Learn more about attendees and Capacity.
{{ attendees_list }}Your Website URL
Go to WordPress Dashboard > Settings > General and look for the URL section.
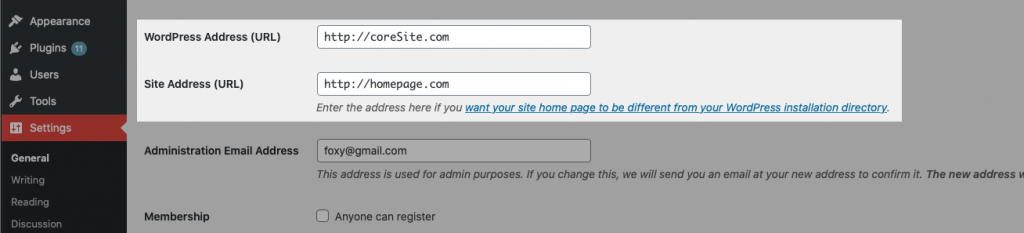
Here you’ll find two URLs, the WordPress Address and Site Address (the page you set as the homepage). Sometimes these will both be the same.
To collect and use the WordPress Address URL:
{{ Global.site_url }}To collect and use the Site Address URL:
{{ Global.home_url }}The Customer Booking URL and Page Title
To add in the URL where the customer booked the appointment:
{{ booking_url }}To add in the Page title where the customer booked the appointment:
{{ booking_title }}Payment Information
If your appointments are set up to accept payments, you can send the customer the following payment information.
Payment Amount
The total amount paid for the booking. If no payment was made, the default value is 0.
{{ Appointment.payment_received }}Payment Status
Verify if the payment was made at the time of booking. This returns a “Paid” or “Unpaid” statement.
{{ Appointment.payment_status }}Payment Method
Display the method of payment. If no payment was made, nothing will be displayed.
{{ Appointment.payment_method }}Add to Calendar Links
Generate a link that users can use to add the appointment information to their calendars. This can be used for admins, team members, or customers.
We don’t have a way to customize the calendar event information passed through these links; if you’d like to customize the calendar events, use our Google Calendar Sync feature instead.
ICS link
{{ add_to_calendar_link.ics }}Google Calendar link
{{ add_to_calendar_link.gcal }}Team Members
Take a look at the twig references from our Team Notifications guide to reference the team member’s name, email, or phone number.