In this document:
Introduction
Using our translation tool, you can import the available translations offered in our WordPress translation system.
To translate the booking app and admin app, you’ll need to:
- Download the Translation Pack
- Apply the Translation Pack to your site
Contributing Translations
Our translations are crowd-sourced, meaning our wonderful customers volunteer to add in these translations.
If you don’t see your language listed or some phrases are missing in your pack, please see our other guide on how you can contribute translations.
Available translations
By default, Simply Schedule Appointments is available in U.S. English. However, as of December 2024, we also have the following translation packs far enough along to be usable for many cases:
- Slovak / Slovenčina
- Portuguese (Portugal) / Português
- Portuguese (Brazil) / Português do Brasil
- Hungarian / Magyar
- Swedish / Svenska
- Italian (Italy) / Italiano
- Russian / Русский
- Turkish /Türkçe
- Estonian / Eesti
- German (Formal) / Deutsch (Sie)
- German / Deutsch
- German / (Switzerland) / Deutsch (Schweiz)
- German (Switzerland, Informal) / Deutsch (Schweiz, Du)
- Czech / Čeština
- Lithuanian / Lietuvių kalba
- Chinese (Taiwan) / 繁體中文
- Arabic / العربية
- Korean / 한국어
- Spanish (Spain) / Español
- Spanish (Mexico) / Español de México
- Spanish (Venezuela) / Español de Venezuela
- French (France) / Français
- Dutch / Nederlands
- Dutch (Belgium) / Nederlands (België)
- Dutch (Formal) / Nederlands (Formeel)
- Polish / Polski
- Danish / Dansk
- English (UK)
- Slovenian / Slovenščina
- Japanese / 日本語
- Croatian / Hrvatski
- Greek / Ελληνικά
- Norwegian / Norsk bokmål
- Icelandic / Íslenska
- Romanian / Română
Downloading Translations
To download and install an in-progress language pack, head to Settings > Translations.

Select one of the available translations from the dropdown menu on the translation screen. Then click the Download and Install button.
The language pack will be fetched, downloaded, and installed into the correct folder on your WordPress site.

Installed Language Packs
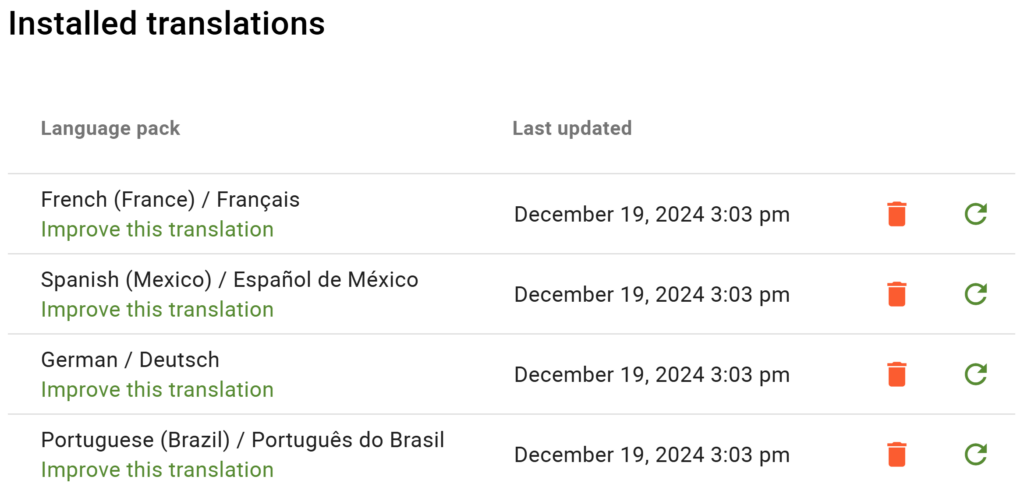
You’ll see the language packs that you’ve downloaded listed at the bottom of the screen:
Under the name of the language pack, there’s a link to Improve this translation. If you see any missing or incorrect translations, you can use this link to find where you can fix them.
The language packs listed here are not Active on your site; you must manually activate them to take effect on your booking app.

Refreshing Language Packs
Since contributors are constantly improving our translations, it’s helpful now and then to refresh your language pack so that you can make sure you’re using the latest version.
Learn more about contributing to the language packs.
Using the Translation Pack
Once you’ve got your language pack downloaded and installed, there are four different ways that you can put that to use on your site:
If you don’t like the translations included in the pack, please see our guide on Editing Phrases and Labels in the Calendar.
Set the Global Language for Your Site
From the WordPress dashboard, head to Settings > General and look for the Site Language setting:

Set the Language for Your User
Each user can select their language. To change your preferred language for your user, from the WordPress dashboard, head to Users > Your profile and look for the Language setting:

Use a Multilingual Plugin
If your site should be available in multiple languages, set up a multilingual plugin like WPML or Polylang. These plugins help you translate on a site that uses multiple languages.
Also, a multilingual plugin on your website would allow for translating user-input strings, but it won’t translate the plugin’s content, as the Simply Schedule Appointments doesn’t directly integrate with WPML, Polylang, or any other multilingual plugin.
The translation language packs included in the plugin will help you translate all the hard-coded text in the plugin.
Using the SSA Locale Shortcode
The default [ssa_booking] shortcode displays the Booking Calendar in your site’s default language.
However, you can override your site’s default language by using the following shortcode format:
[ssa_booking ssa_locale="languageCodeHere"]
You can see a complete list of all the language codes here. The shortcode format uses the text highlighted in yellow underneath each language description:

For example, to display your booking calendar in Danish, the shortcode looks like this:
[ssa_booking ssa_locale="da_DK"]
Your language must be in our language pack list; if not, you’ll need to contribute translations to your language pack. See our other guide on how you can contribute to translation.
RTL Languages
SSA supports right-to-left languages such as Arabic and Hebrew. When you display a booking calendar using an RTL language pack, the icons, text, and other details on the booking app will appear ‘flipped’ horizontally to match the RTL text direction.
To correctly display your booking calendar in right-to-left (RTL) languages, add ssa_is_rtl=”1″ to your calendar shortcode. For example, to display your booking calendar in Arabic, the shortcode looks like this:
[ssa_booking ssa_locale="ar" ssa_is_rtl="1"]

Translating Notifications and Appointment Types
Translation packs included in the plugin don’t auto-translate notifications or appointment types.
You can review the Multi-Language Site Support guide to learn how you can manually translate the appointment types and notifications by re-writing them in your preferred language within the SSA plugin.
Additionally, you can utilize the Twig template to swap messages for notifications according to the customer’s locale, which the system detects at the time of booking.
Strings such as Name, Zip (Zip Code), Phone, City, State, and Notes are auto-translated on your booking calendar if translation packs are installed and utilized properly on a non-English page.
The auto-translation will work regardless of whether these strings are selected directly from the pre-defined customer information fields or created via the custom fields feature under the Customer Information tab in the Appointment Type settings.

