In this document:
- Introduction
- How the Team Booking Feature Works
- Set up Team Booking
- 1. Enable Team Member Feature
- 2. Add Team Members
- 3. Give Teammates Personal Schedule Editing Permissions (Optional)
- 4. Assign Teammates to Appointment Types
- 5. Turn on Independent Availability for Appointment Types (Optional)
- 6. Configure Team Notifications
- Accessing Team Settings After Setup
Introduction
This guide will cover setting up the Team Booking feature in SSA.
The Team Members feature will allow you to:
- Automatically assign new bookings to your team members
- Notify team members when they receive a new booking
- Allow your Team Members to view their assigned bookings and manage their schedule
How the Team Booking Feature Works
With the team member feature enabled and set up, SSA will now be able to assign new bookings to your team.
You can choose which appointment types require team assignments. Not all your appointment types need to be tied to the team member feature.
See our guide on Booking Team Members to better understand the booking process with the Team feature enabled.
Custom Working Hours
As an admin, you can set the availability in two ways.
Each Appointment Type could accept team bookings based on the Appointment Type’s availability alone. For example, the booking calendar is set from 9 AM – 3 PM, so the Team members will also be available to accept bookings during this time.
Or, you could allow each teammate to set custom working hours and accept team bookings based on all the schedules’ overlap.
Blackout Dates
If you also have the Blackout Dates feature enabled, you could set individual Blackout Dates for each teammate and business-wide dates.
You can use this to ensure any given teammate does not get a booking assigned to them on their days off. Or, make sure your whole team doesn’t get bookings for holidays off.
Team Google Calendar Sync
The admin can allow team members to sync their Google Calendar. This will then allow SSA to check each member’s Google Calendar for conflicts.
Set up Team Booking
The Team booking feature is simple to set up if you’re starting from scratch – continue with the following steps, and you’ll be set up in no time.
If you’ve been a long-time user of SSA and recently upgraded to Business, please get in touch with our support team to receive help on transitioning to using Team Members.
Complete Video Walkthrough
This video goes through every step in this guide and some bonus material, such as embedding team calendars on your site. Feel free to use the video bookmarks in the description to navigate the different chapters.

1. Enable Team Member Feature
Go to SSA Settings > scroll down to the bottom until you see the Team Card > Toggle the Card On.
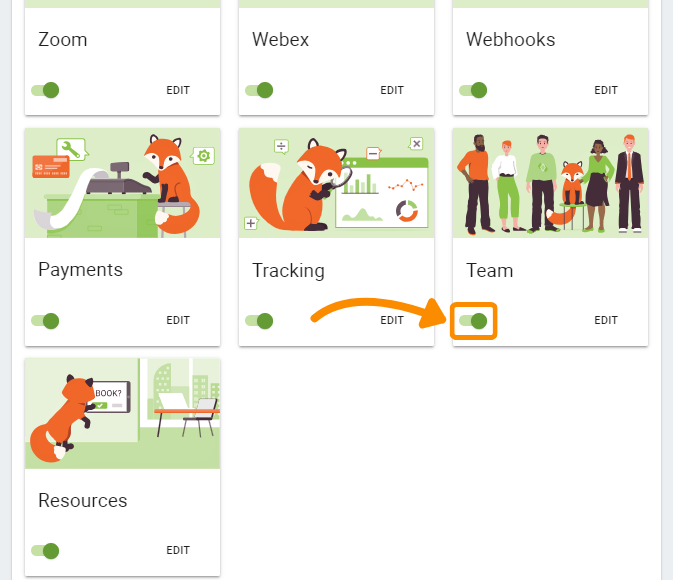
2. Add Team Members
After toggling on the Team Card, you can click on the card or use the Edit button to open the Team settings.
Here, you’ll be able to:
- Add new Team Members
- Edit existing Team Members
- Set inactive Team Members, and
- Delete Inactive Team Members
Set Custom Working Hours and Blackout Dates as Admin (Optional)
After creating your Teammates’ profiles on SSA, you can either leave the default availability from the appointment types or create custom schedules.
A custom schedule would only allow bookings when the teammate AND appointment type are available. It makes the overlapping time slots appear on the booking calendar.
Please see our other guide on Editing Team Members to learn more about these settings.
Create a new WordPress User Profile (Optional)
If Simply Schedule Appointments can’t find a WordPress user email that matches the one included in the Team profile, you can create a new WP user profile for them on the spot. Check the Can this user login and manage their own appointments? Checkbox from their SSA Team Profile Settings under the Contact tab.
3. Give Teammates Personal Schedule Editing Permissions (Optional)
You could also allow your teammates to edit their custom schedules, sync to Google Calendar, and blackout dates. This will require their WordPress user profile on your site.
We built out a dedicated ‘Team Member’ User role to allow teammates to only have permission to access their own booked appointments, schedule information, and settings.
Learn more about the Team Member User role and how to let your teammates log in to see their appointments.
4. Assign Teammates to Appointment Types
Next, you must tie the teammates to the Appointment Types. This will allow that teammate to receive new bookings for this booking calendar.
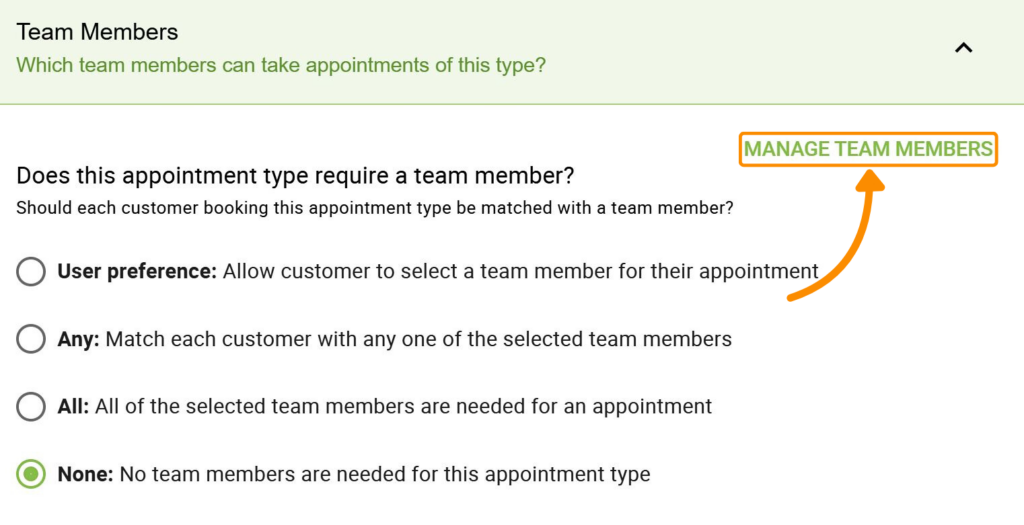
Go to Appointment Types > choose the Appointment Type that requires teammates > Open the new Team Members tab.
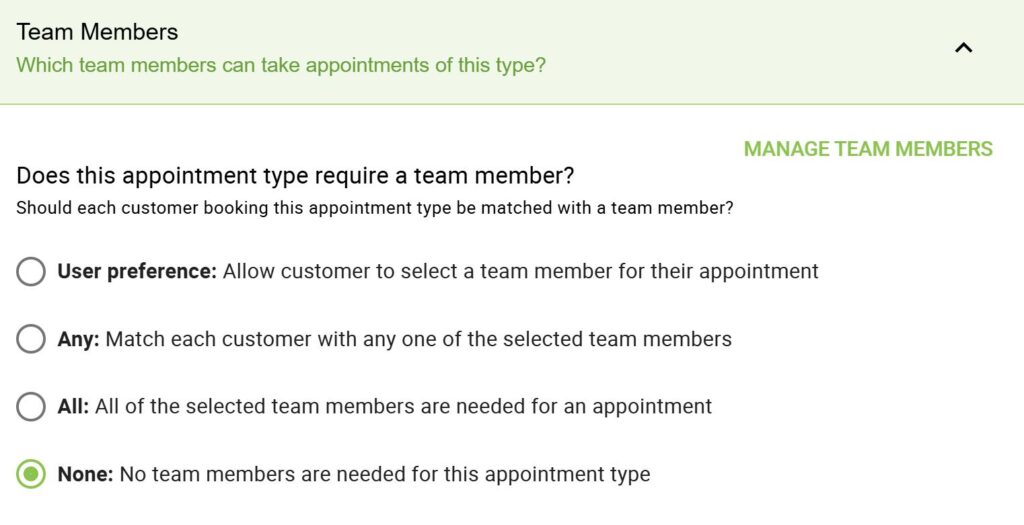
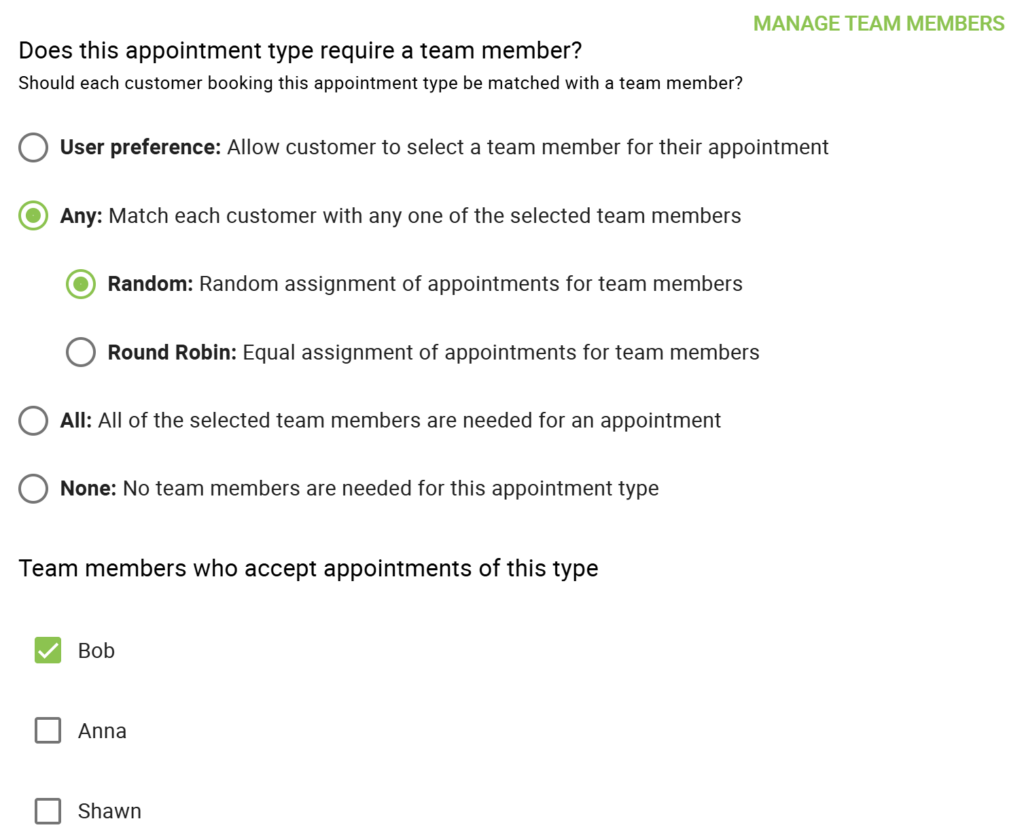
You’ll see four options:
- User Preference: Assign new bookings to one chosen by the User from the selected team members.
- Any: Assign new bookings to one of the selected team members.
- Random: Assign new bookings randomly.
- Round Robin: Assign new bookings equally in a specific order.
- All: Assign new bookings to all the selected team members.
- None: No team members are needed for this appointment type.
By default, the appointment types are set to None; you must edit each appointment type you’d like to assign teammates to.
When you switch from None to User Preference, Any, or All, you’ll see the list of team members who can accept bookings for that Appointment Type. Scroll through the list and use the checkboxes to make your selection.
Any Option for Team Member Selection
If you select Any, you’ll have two more options to choose from.
Random
If you select this option, selected team members will be assigned randomly to new appointments without any specific order.
Let’s say you have three team members (A, B, and C) assigned to an appointment type, and you receive 9 new bookings for different appointments, it’s possible that A might get 4 bookings, B might get 3, and C might get 2 bookings, or any similar arrangement.
Round Robin
If you select this option, selected team members will receive an equal number of assignments in a specific order for new appointments.
For instance, if you receive 9 new bookings for different appointments, each Team Member (A, B, and C) would be allocated 3 bookings each.
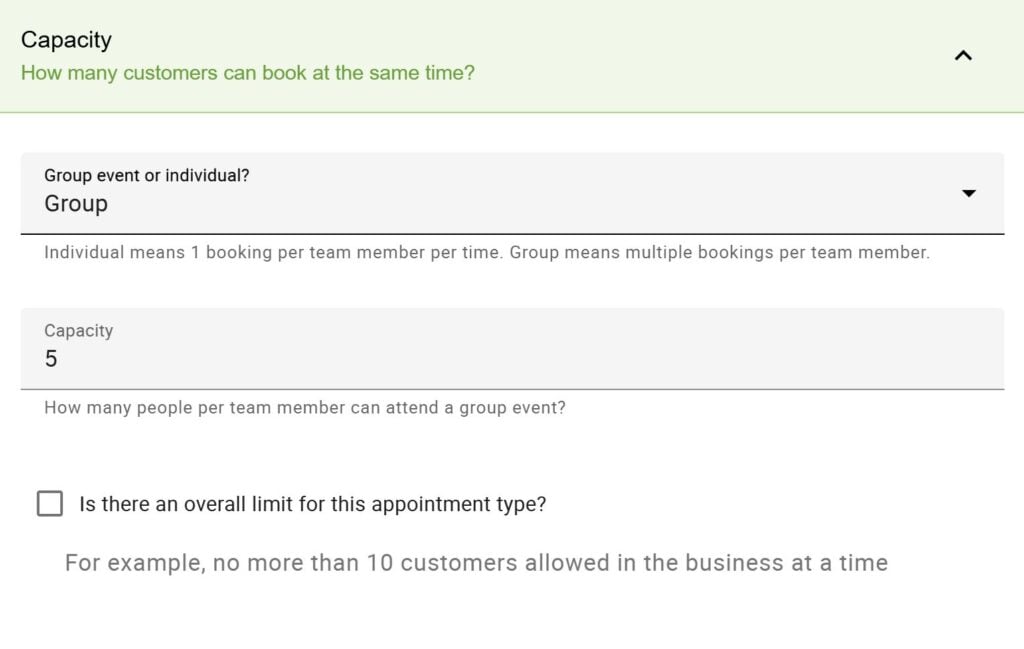
Capacity for Team Bookings (Optional)
When using Team Members with your Appointment Types, if your Appointment Type Capacity setting is set to Individual, the Appointment Type will automatically have a Capacity equal to the number of Team Members selected.
By default, this means one booking per Team Member per time slot.
For example, if I have 2 Team Members selected, my Capacity will be set to 2, and 2 people will be able to book the same time slot.
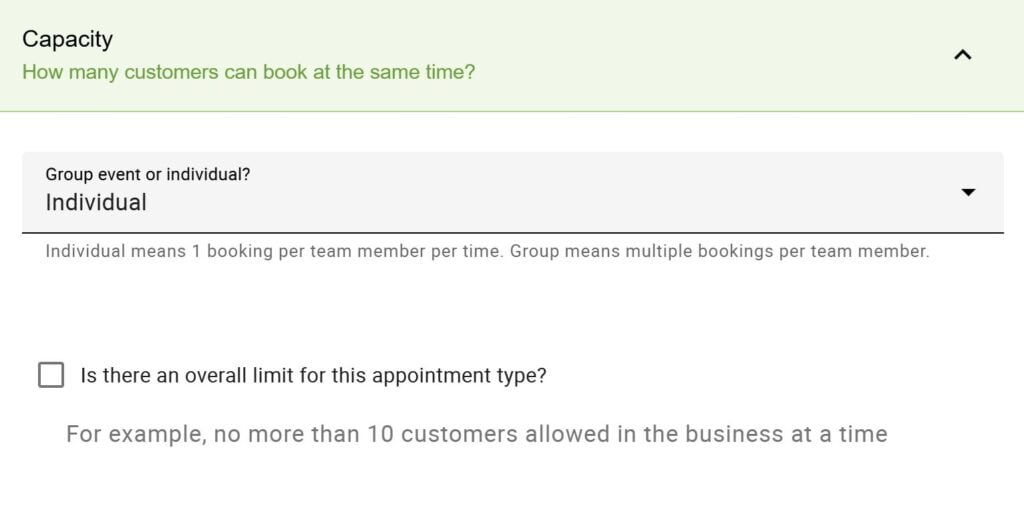
If Capacity is set to Group, Team Members can get multiple bookings per member.
For example, if I have 2 Team Members and would like each member to receive five bookings at a time, I would set the Group Capacity to 5.
In this case, irrespective of the option you’ve selected (Any, All, or User Preference), each team member can receive a maximum of 5 bookings at any given timeslot.
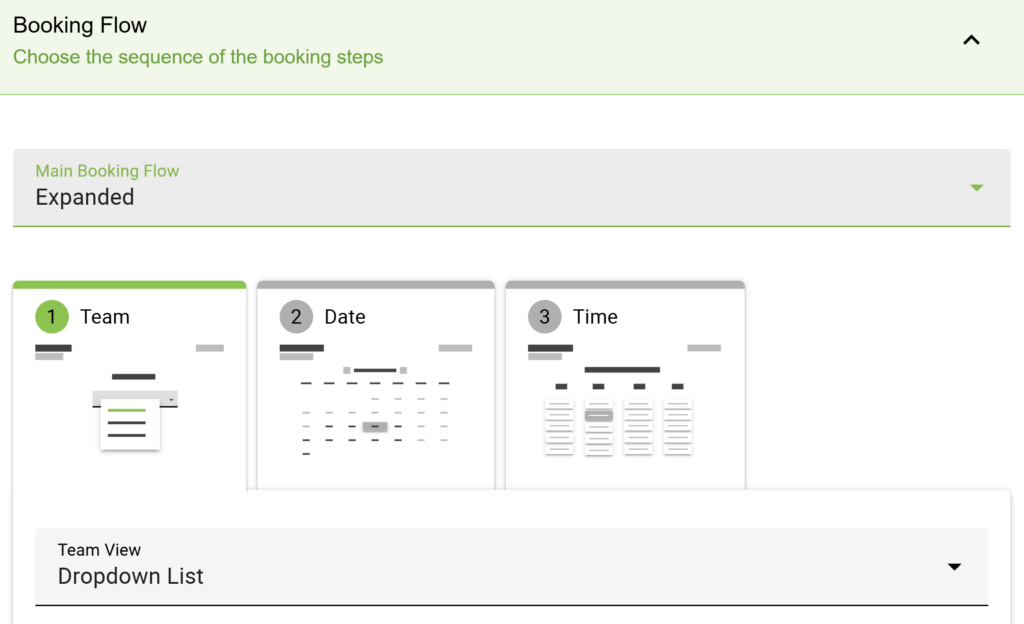
Booking Flows with User Preference
Choosing the User Preference option under Team Booking will add a new step to your Booking Flow settings. This step allows you to choose how you want to display your team members during the booking process—either through a Dropdown List or Radio Buttons.
5. Turn on Independent Availability for Appointment Types (Optional)
By default, the plugin is built to be operated by a single Admin – this means all the Appointment Types depend on each other to prevent double bookings for the single operator. For example, if a single business owner takes all the bookings, we wouldn’t want them to have multiple bookings between their services.
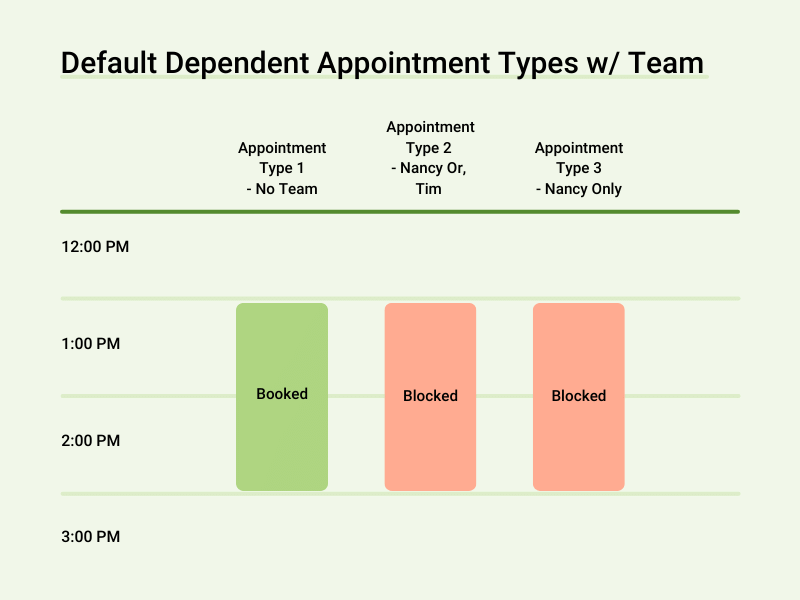
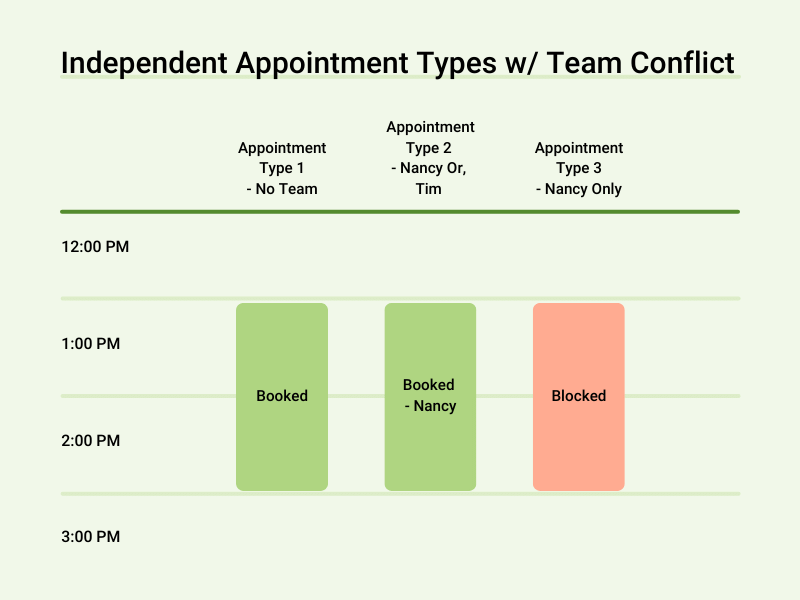
But now that you’re introducing the Team booking feature, this allows you to set the dependencies between the Appointment Types via team members instead of using the default functionality. With this in mind, you can turn off the default functionality and run the booking system with Independent Availability for Appointment Types.
Learn how to turn on the Independent Availability for Appointment Types setting.

This way, you’ll be able to allow bookings between Team Member A in one service calendar and Team Member B in another service calendar to run simultaneously. Or, if an Appointment Type doesn’t require a team member to run, then that calendar can have simultaneous bookings with another calendar that does require team members.
If you have +2 Appointment Types that don’t require actual Team Members, make sure you’re okay with booking between them simultaneously. If you’re not okay with this, create a dummy team member profile to create the dependency between the two.
And, with this on, remember the Team Booking feature will handle the dependencies. So if Team Member A is booked in one service calendar, they’ll be blocked off during that appointment time in any other service calendar they’re assigned.
6. Configure Team Notifications
Lastly, you’ll need to update your notifications so that your teammates can receive emails or texts for booking reminders.
We’ve added a couple more Twig Code Templates so that you can add Team Name and Emails to the notifications:
- {{team_member_email}}
- {{team_member_name}}
Please see our guide on Team Notifications to learn more about how to customize your teammates’ notifications.
Accessing Team Settings After Setup
If you need to make updates after setting up the Team Booking feature, you can quickly access the Team Settings in a few different ways.
Appointment Type Team Members Tab
A Manage Team Members button is located within the Team Member tab to take you directly to the Team listings page.
A Team menu item is located within the Appointments tab of the WordPress dashboard.

Related Guides
-

Business Edition Guide
-
Team Notifications
-
Viewing Team Bookings
-
Editing Team Members
-
Team Member Google Calendar Sync