You’ve probably spent a lot of time hosting and attending online meetings since workforces became remote. One of the top video conferencing tools being Webex, in this article, we’ll share some of the different ways of scheduling a Webex meeting. We will also show you how to schedule a meeting in Webex using our Simply Schedule Appointments Webex Integration.
Video conferencing is the future of work and has become a huge part of organizations for planning and remote communication. Video conferencing will reach $11.56 billion by 2027 and the video conferencing boom will not end with the pandemic, according to Transparency Market Research.
In this blog post:
What is Webex?
Webex is a collaborative workspace platform that combines video conferencing with tons of other capabilities like document sharing and messaging. Its intuitive interface makes it easier for teams to participate and share ideas by holding conferences and live webinars as well as showcasing video presentations and slideshows.
Webex is one of the most preferred, well-established solutions today. What’s more, it’s super easy to schedule a Webex meeting through your Mac, iPhone, PC, Android, or iPad.
Is Webex Free to Use?
Yes, Webex is free to use and allows free meetings for up to 100 attendees without any time limit. And includes other free features such as screen sharing, interactive whiteboards, a personal meeting room, and instant messaging.

How to Schedule a Webex Meeting — Using Webex for Free
There are two ways to go about using the Webex Video Conferencing feature:
- Start a Webex meeting right from your dashboard, just make sure to share your Personal Meeting Room link with your guests
- Or, Schedule one for later (manually from the Webex dashboard or using an plugin software like Simply Schedule Appointments)
First, Create Your Free Webex Account
Head to the Webex website in your web browser. Click on Start for Free if you do not have an account already.
You’ll then be guided to the steps you need to take to create an account. If you already have an account, click on Sign in and then click on Webex Meetings. You can now sign in using your account credentials.
Start a Webex Meeting from the Dashboard
Setting up a Webex meeting through the Internet browser is simple and quick, use this method if you’ve already shared you Personal Meeting Room Link with your guest.
Here’s how you can go about it.
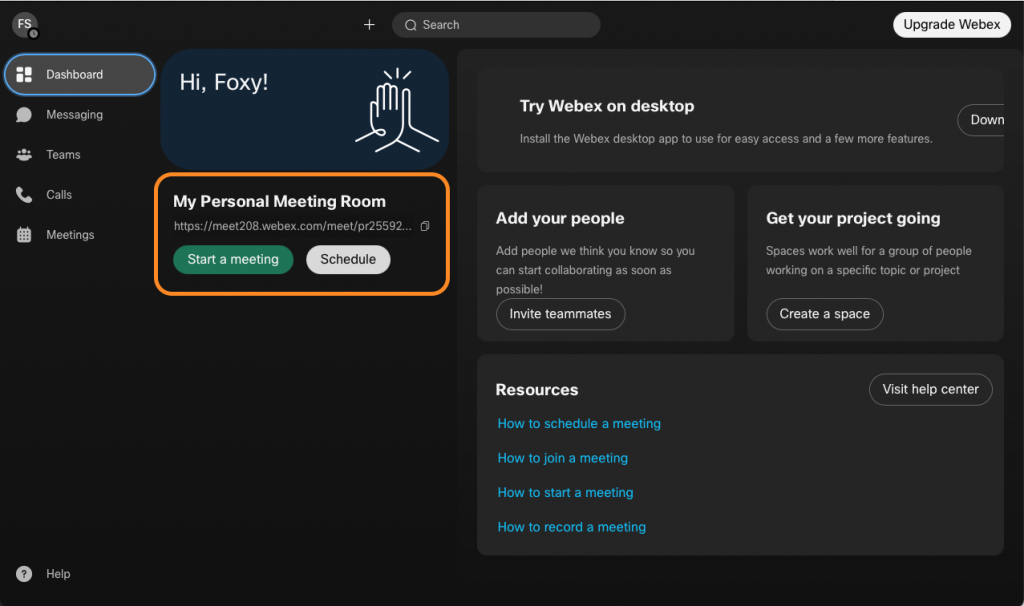
- Once you’re on the Webex Dashboard page, copy the URL under the My Personal Meeting Room heading. This URL is the link to your meeting and you can share it with the attendees.
- Click on Start a meeting, followed by Join from your browser while Webex gets ready to start the meeting.
- You’ll see a three-dot menu on the screen. Use it to choose the Speaker, Camera, and Microphone.
- In the dialog box under Settings, make sure you choose the correct device so that you can hear and be heard properly. Once done, close the box.
- To get the meeting URL again, click the ‘i’ icon on the top left of your screen. Copy the link and send it to others to join.
Webex Personal Room – Shareable link to give to your guests
Webex gives users their own personal room, which is essentially a private virtual conference space. You can share the link to the personal room with team members or customers to start an instant meeting with them.
- Head to the Webex website and log in.
- Once you’re on the Webex Dashboard page, copy the URL under the My Personal Meeting Room heading. This URL is the link to your meeting and you can share it with the attendees.
Once they have your Personal Meeting Room Link, they can join you for a private video conferencing session just by clicking your link. All you have to do is Start a Webex Meeting by following the steps outlined above.
Manually Schedule a Webex Meeting For Later
Schedule a meeting for later in the week or a month from now using Webex. Scheduling a meeting for later is as simple and hassle-free as scheduling a meeting for today. Here’s how:
- Head to the Webex website and log in. Once you’re in the Dashboard, click on Schedule.
- On the Schedule a Meeting page, complete the form to schedule your meeting. You’ll have to provide a meeting title and set the date, time and password. Be sure to check the time zone before you choose the date and time.
- Next, enter the email address of the people you want to invite to the meeting.
- Once you have selected all the names, click on Schedule.
- As you will be the host of the meeting, you can click the link in the email to start the meeting at the scheduled time.
Using this method, you don’t have to share your Personal Meeting Room Link since Webex sends them an email containing your meeting link. At the time of your scheduled meeting, both you and your guest can visit the email invitation and join from there.
How to Automatically Schedule a Meeting in Webex from a WordPress Website
Simply Schedule Appointments (SSA) is a WordPress appointment booking plugin that allows users to easily schedule meetings and appointments with a single form submission on your site. In this case, you can use the plugin’s Web Meetings feature to attach your personal meeting URL. Alternatively, you can use their direct Webex integration to generate a private or open web meeting link for each appointment.
Here’s how to go about it:
We are going to assume you have already signed up with SSA and set up the Webex integration in the plugin.
Use Your Personal Meeting Room Link
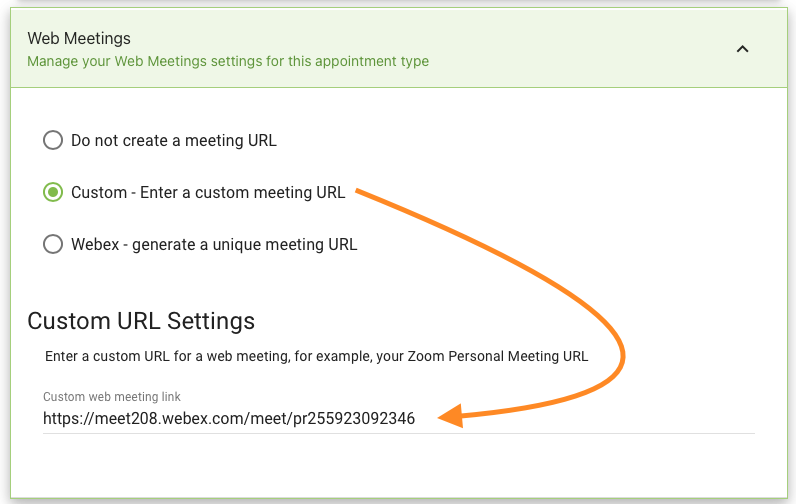
- Open Appointment Type settings on your dashboard.
- Under the Web Meetings tab, select Custom – Enter custom meeting URL.
- Selecting this option will open up a field, where you can enter a link. This is where you will enter the link to your Webex personal room. If you want more information regarding this, you can refer to this Webex article.
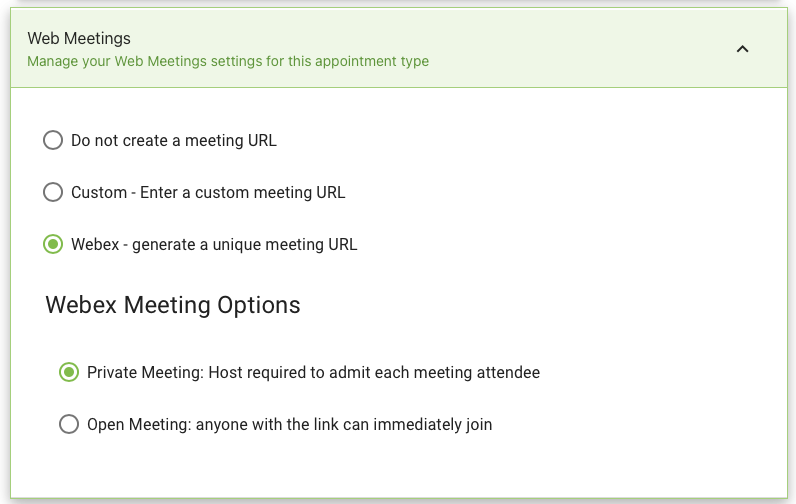
Generate Webex Meeting Link for each Appointment
Again, we’re going to assume you’ve already set up the Webex integration in the SSA plugin.
- Open Appointment Type settings on your dashboard.
- Under the Web Meetings tab, select Webex.
- Selecting this option will give you two options – Private or Open Meetings. Choose the one that best suits you.
Webex Meeting Scheduling for WordPress Walkthrough

7 Webex Essentials For Staying Connected
Here are a few tips to help you enjoy the meeting without any distractions and technical issues.
- Set your schedule: A lot of people join the meetings at 30-minute increments while many join in late. So, if you want to enjoy a faster join experience, try to join about 5 minutes early or schedule the meeting in the 45th minute or 15th minute of the hour.
- End all background applications: Whether you are using them or not, it’s important to end all the background applications on the device. Before the meeting, remember to close any applications that you are not using so as to enjoy the best experience.
- Check the Wi-Fi: It’s very important to have uninterrupted Wi-Fi connectivity. Run a speed test to see if the internet speed is enough to handle the call. If you have to share content for the meeting, do it before the call. If you share files for a meeting before it starts — or share a link to the file instead of sharing during the meeting — it’ll save time and bandwidth. This will ensure good audio and video experience.
- Stop the simultaneous activities: All of us love to check out online stores and give a look at binge-worthy TV series! But if you are joining the meeting, you need to stop all the simultaneous activities. If you are joining from your home, ask your family to stop the streaming activities so that you can focus on the meeting.
- Opt for audio over video: If during the meeting, you notice that the connection quality is low and the guests are unable to see and hear you properly, it’s best to choose audio over video.
- Move to call in audio: Whenever the audio and video experience does not work, you can still continue to collaborate. Simply call in using the dial-in numbers in the meeting invitation to join through the landline or cell phone.
- Stop the distractions: Try to mute the line when you are not talking and encourage other attendees to do the same. This will help reduce the distractions when others are communicating.
Takeaway Thoughts
Setting up a meeting in Webex is very easy and it allows for a great collaborative experience. Whether this is your first time or you have set up meetings in the past, remember these meeting etiquettes and try to follow them so that each member enjoys the video call.
Webex is a great platform for collaboration and through the above steps, you will be able to set up a meeting within a few minutes. You can also take advantage of Webex’s Personal Room facility to hold impromptu meetings with Simply Schedule Appointments and with other calendar apps like Google Calendar to keep attendees on track.