In this document:
Introduction
WP Fusion can help you smoothly integrate and automate your WordPress website with CRMs and other services you use every day. In this guide, we’re going to show you how WP Fusion integrates Simply Schedule Appointments with its supported CRMs.
This integration will allow you to:
- Sync bookings with any of the 50+ supported CRMS
- Apply tags based on appointment status
- Create segments in your marketing lists
- Trigger automations to follow up with customers before and after their appointment time
Resources
How to Integrate SSA with WP Fusion
First, you must have one of their paid plugins (Personal, Plus, or Professional licenses) installed on your site. This will enable the WordPress plugin integrations, which include SSA.
Once your site is set up with one of their paid editions and the CRM of your choice, you’ll be able to use the Simply Schedule Appointments Custom Fields and Integration Tags.
Video Walkthrough

Syncing Bookings to Your CRMs Contact List
When an appointment is booked or canceled, any enabled fields (highlighted in green) will be synced to the customer’s contact record in your CRM.
To set this up:
- Add in the fields you want to collect from SSA in your CRM
- Double-check that you’re passing in the correct fields from SSA
- Use WP Fusion Contact Fields to pass SSA fields to your CRM
- Choose a customer list to add your new contacts to based on appointment status
Add the SSA Fields to the CRM
For this example, I’m going to use Sendinblue CRM. If you have questions about your personal CRM, visit the WPFusion documentation to find more setup instructions.
On the CRMs end, you’ll need to add the fields you’d like to record from Simply Schedule Appointments.
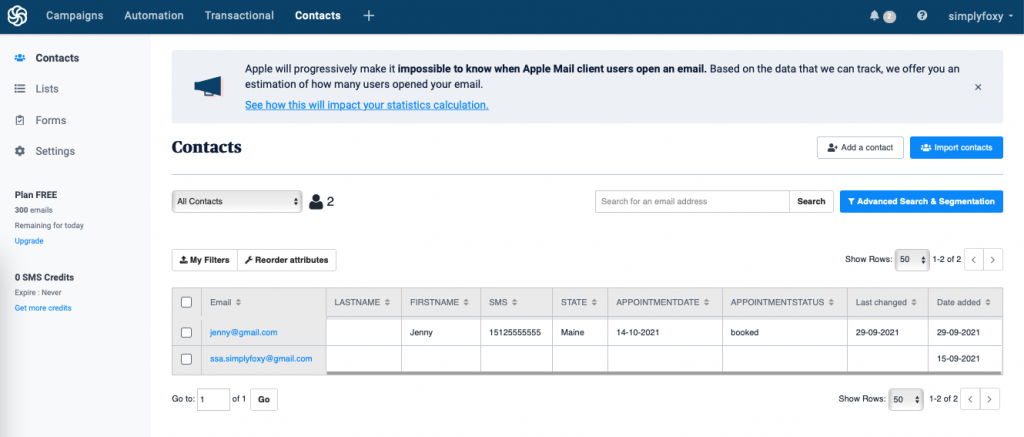
In the example below, I added STATE, APPOINTMENTDATE, AND APPOINTMENTSTATUS. I’ll collect these from SSA along with LASTNAME, FIRSTNAME, EMAIL, AND SMS.
Double-Check Your SSA Fields
Most fields should be passed in automatically, like Appointment Start Date or Appointment Type Title.
But, some are dependent on the settings you choose for your Appointment Types. Just make sure that your Appointment Type settings are passing the following fields if you’re planning on collecting them in your CRM:
- Web Meeting URL
- Price Full
- Payment Method
- Zip
- State
- City
- Address
- Phone
For example, if I want to collect the State in the CRM customer record, I need to make sure to add a State field to the booking form.
Use WP Fusion to Pass SSA Fields to the CRM
Now that the CRM is set up with the new SSA fields and we’ve double-checked to ensure we’re passing the correct fields in SSA, we can make the connection in WP Fusion.
Go to Settings > Contact Fields > scroll to the Simply Schedule Appointments section, and using the dropdown on the right, go ahead and match the CRM fields with the SSA fields.
If you don’t see the CRM fields we created, you may need to use the Refresh Available Lists & Fields button. Or, re-enter and save your API key under the Setup tab.
Choose Customer List to Add New Contacts To
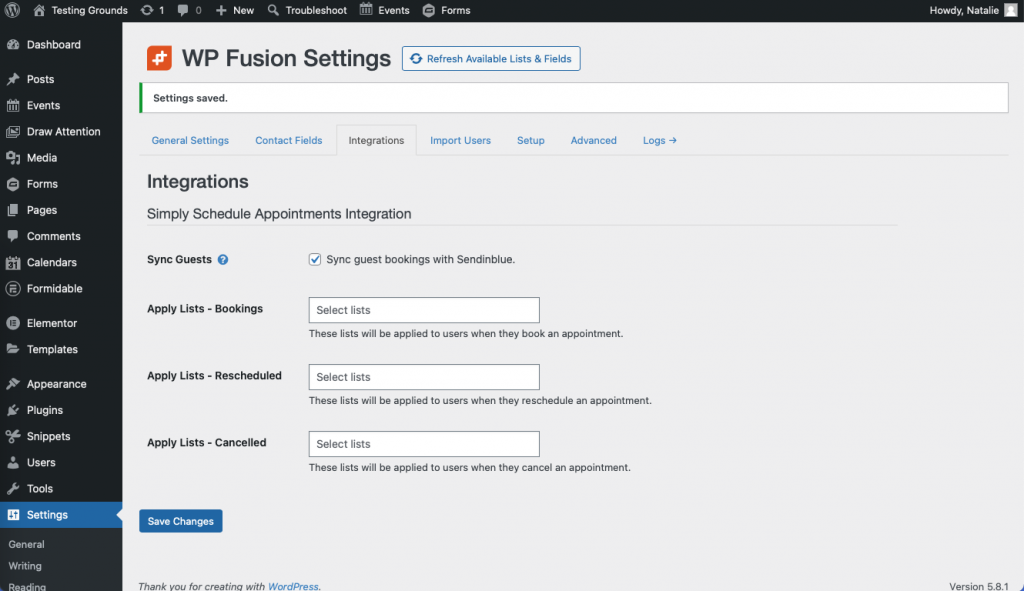
Next, we’ll need to choose which lists your new contacts will be added to based on their appointment status. To edit the lists, go to WP Fusion > Integrations > Simply Schedule Appointments.
The options are:
- Booking – Apply Lists: Add customer to selected lists when they book an appointment.
- Rescheduled – Apply Lists: Add customer to selected lists when they reschedule an appointment.
- Canceled – Apply Lists: Add customer to selected lists when they cancel an appointment.
This section also includes the Sync Guests option. This setting is enabled by default— anyone who makes an appointment booking via Simply Schedule Appointments will have a contact record created (or updated) in your CRM. You can then disable Sync Guests if you only want to sync the appointment details for registered users.
Test Out the New Integration
Finally, after the Contact Fields have been set up, book a test appointment in SSA. You should see the new test contact appear in your CRMs contact list.
In this example, I booked an appointment as Jenny. Evidently, all of the information from the booking form was sent over successfully.
Notes on the Contact Fields
- At this time, we don’t have a way to pass the Last Name field. Anything that passes through the SSA Name field is added to the First Name field in your CRM.
- The Appointment Date will only pass the day, not the time. We don’t have a pre-set contact field for the time currently.
- For custom fields, please contact the WP Fusion team for help creating a new Field Key for their plugin.