In this document:
Introduction
In the past, turning on the SSA Tracking feature alone would automatically pass the booking apps’ custom events to Google Analytics. But with the recent transition to Google Analytics 4 from Universal Analytics, the process is now complex because of the need to pass the custom events through Google Tag Manager.
To pass custom events from our plugin requires that you do so through Google Tag Manager. This includes setting up the Trigger, Variables, and the Tags in a container to pass onto Google Analytics.
There’s not much documentation online to help you do this, so we wanted to put together some resources so that our tracking feature can continue to be useful to your analytics research.
Two methods we’re going to cover
- Import the container we’ve created and merge it into your existing (or new) container in GTM
- Or, create each Trigger, Variable, and Tag from scratch: Coming soon!
Universal Analytics vs. Google Analytics 4
Universal Analytics (UA) is the previous generation of Google Analytics; if you set up Google Analytics on your site before October 14, 2020, you’re most likely using UA.
Google Analytics 4 (GA4) is the new generation of Google Analytics that promises more helpful insights through machine learning models. Google claims that this is now the default experience for GA and is where they will be investing all their future improvements.
If you’re using the older UA properties on your site, Google recommends that you begin using the new GA4 properties alongside your existing ones. Read more about what Google has to say about this transition here.
Important Notes Before We Start
Before we start, we want to outline a couple of things.
- We don’t offer support for Google Analytics or Google Tag Manager. This is beyond our level of knowledge. If you need additional help, we recommend you reach out to an analytics developer.
- The plugin is tracking-ready; this only means that we’ve done the work of adding the Javascript necessary to pass information to Google Tag Manager.
- Simply Schedule Appointments is a single-page application built using Vue.js and the WordPress REST API. Because of this, there aren’t any actual page views to track; you can only track virtual page views.
Method 1: Importing Our Pre-Made Google Tag Manager Container
Pre-Requisites
- A Google Tag Manager and Google Analytics account.
- Make sure to set up the Google Manager scripts on your website. (I used the Insert Headers and Footer plugin for this).
- Turn on the SSA Tracking settings in the plugin.
Download the Container’s JSON File
To start, you will need to download the pre-made container; this holds the Triggers, Variables, and Tags you need to send the custom events to Google Analytics.
Download the JSON Container File Here
Import the Container
If you do not have an existing container for your website, you’ll need to create a new one on Google Tag Manager.
After creating a container, or if you already have an existing one, you’ll need to access the Admin tab from the container’s main dashboard.
Next, you’ll need to select the Import Container tab.
From here, you can upload the JSON file you collected earlier, choose a workspace, and choose your import option.
For my set up, I chose an Existing workspace. And, for the import option, I would suggest you choose what’s best for you.
If you just created a new container, feel free to use the Overwrite option.
But, if you had a pre-existing container, I’d suggest you choose the Merge option and Rename Conflicting Tags, Triggers, and Variables.
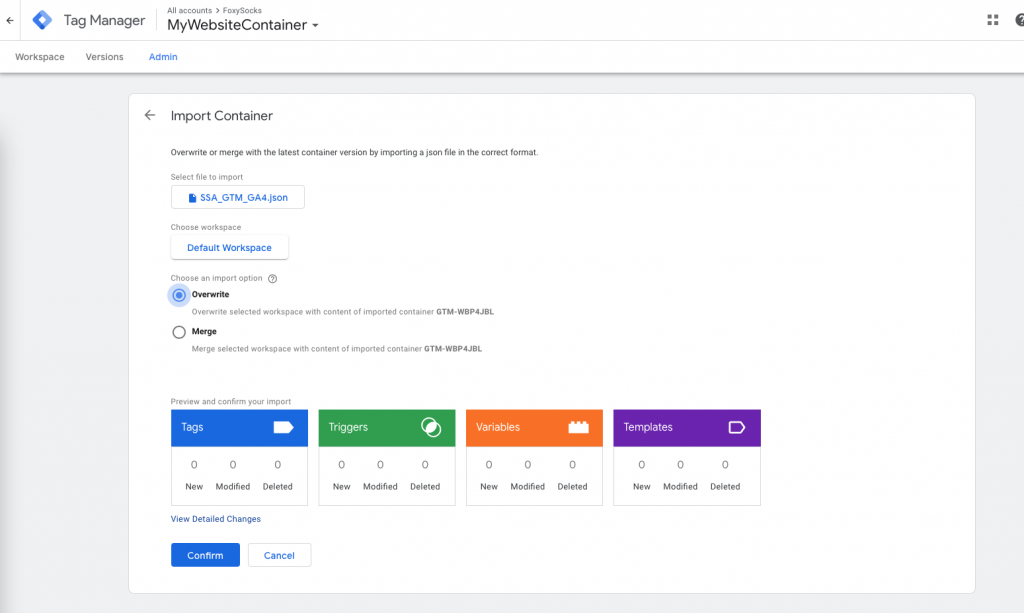
Click Confirm to continue.
Replace the Measurement ID
Now that you’ve imported the container, you’ll need to replace the Measurement ID in the GA4 Tag.
Please refer to the Youtube video above if you’re stuck on this step.
Here are a couple of guides to find the Measurement ID in both GA4 and Universal Analytics:
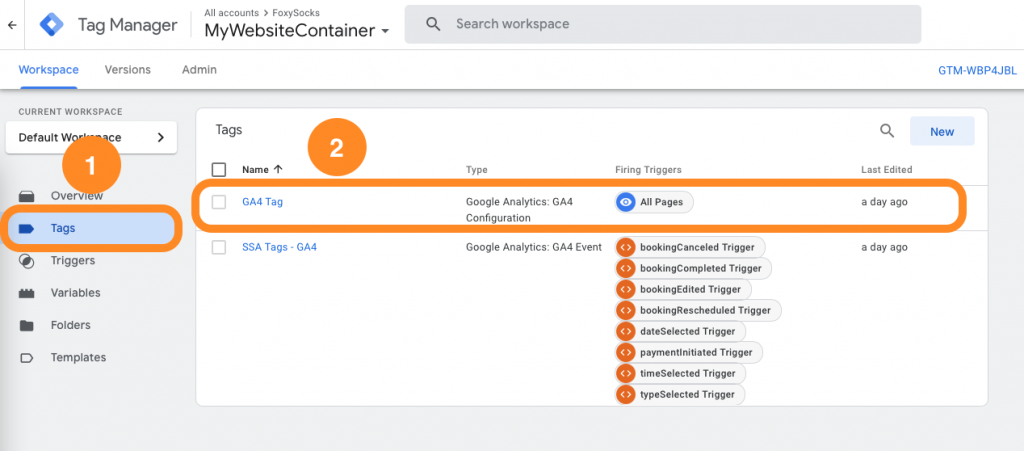
After collecting the Measurement ID (or “G-” ID), go to Google Tag Manager and open the Tags tab. Open the GA4 Tag.
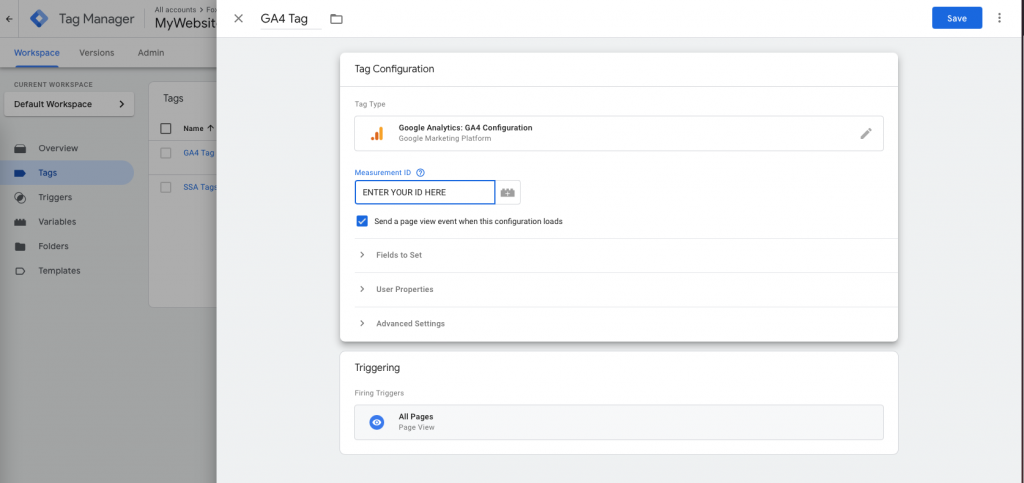
Go ahead and replace the Measurement ID you see there with the one you collected from your Google Analytics account. Click Save.
Publish the Container and Wait
After changing the Measurement ID, go ahead and Save/Publish the container. Here’s a Google guide with more information on Publishing.
It will take up to 24 hours to see your changes take place in the Events tab in Google Analytics.
Method #2: Create Each Trigger, Variable, and Tag From Scratch in Google Tag Manager
Instructions are coming soon! In the meantime, here is a list of all the virtual paths and events coded into the plugin:
Google Tag Manager Page Tracking
We’re sending the following information about the virtual paths to Google Tag Manager when a customer books an appointment:
| URL | Page Title | Description |
|---|---|---|
| http://yoursite.com/ssa/select-appointment-type | Select an appointment type* | When a customer views the screen where they need to select an appointment type |
| http://yoursite.com/ssa/select-date | Select a date* | When a customer views the screen where they need to select a date for their appointment |
| http://yoursite.com/ssa/select-time | Select a time* | When a customer views the screen where they need to select a time for their appointment |
| http://yoursite.com/ssa/booking-form | Enter customer information* | When a customer views the booking form where they fill in their contact information |
| http://yoursite.com/ssa/booked | Appointment booked* | When a customer completes appointment booking and views the confirmation screen |
| http://yoursite.com/ssa/modify-appointment | Modify a booked appointment* | If a customer clicks the links to edit, reschedule or cancel in their confirmation email |
* Page titles are translatable. If you’ve translated your site/SSA into another language, you will have different page titles
Google Tag Manager Event Tracking
We’re tracking the following events and data for Google Tag Manager:
| event | Description | Associated Data |
|---|---|---|
| typeSelected | Customer selects an appointment type | appointmentType: Title of the appointment type |
| dateSelected | Customer selects a date for their appointment | appointmentType: Title of the appointment type |
| timeSelected | Customer selects a time for their appointment | appointmentType: Title of the appointment type |
| paymentInitiated | Customer clicks the ‘Confirm & Pay’ button | appointmentType: Title of the appointment type |
| bookingCompleted | When a customer completes appointment booking | appointmentType: Title of the appointment type conversionValue: Price of the appointment type, if any currency: The currency for the payment |
| bookingRescheduled | Customer reschedules an appointment | appointmentType: Title of the appointment type |
| bookingEdited | Customer edits their contact information for an appointment | appointmentType: Title of the appointment type |
| bookingCanceled | Customer cancels their appointment | appointmentType: Title of the appointment type |
Basic Event Configuration and Reporting in Google Analytics
Now that you’ve passed the custom events through Google Tag Manager, you’ll be well on your way to begin tracking the Simply Schedule Appointments events in Google Analytics.
After finishing with either Method 1 or 2 from above and waiting for at least 24 hours, you can continue to either view your events or mark some of them as conversions.
Viewing the Google Analytics 4 Events and Conversions
Events are actions that visitors or leads take on your website. It’s vital information to know as you can make informed decisions based on actions your visitors take on your website.
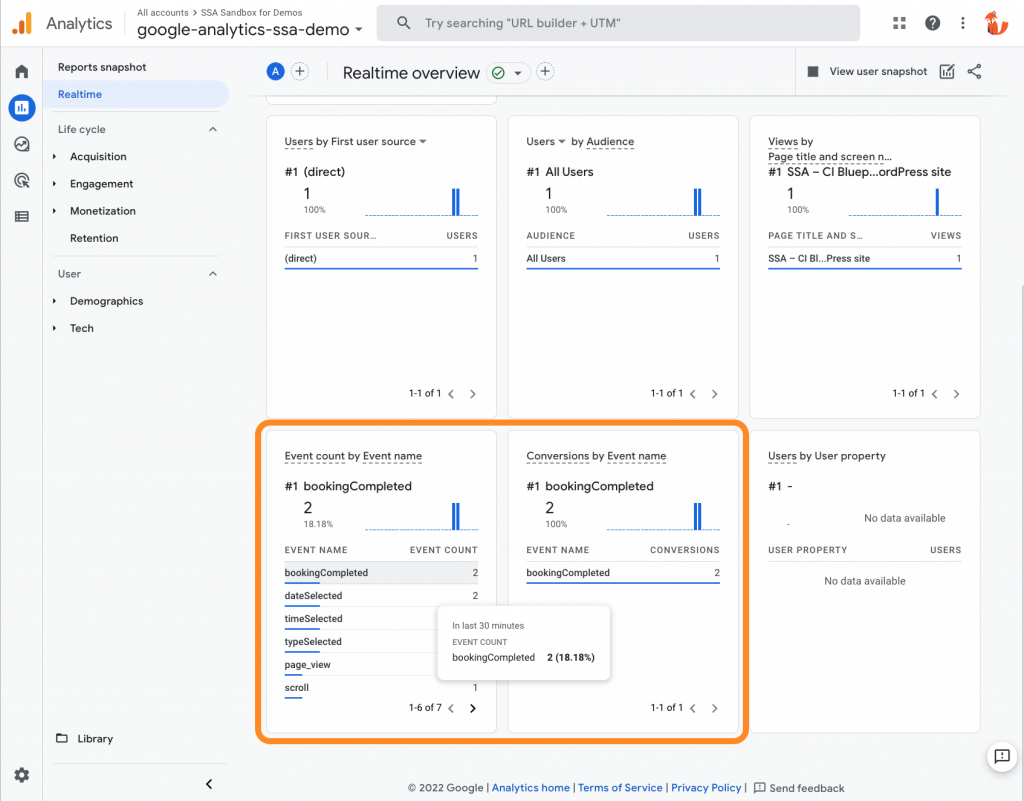
Realtime View
Go to Google Analytics > Reports > Realtime. Go ahead and poke around your site’s booking page and calendars to see the events happening in real time.
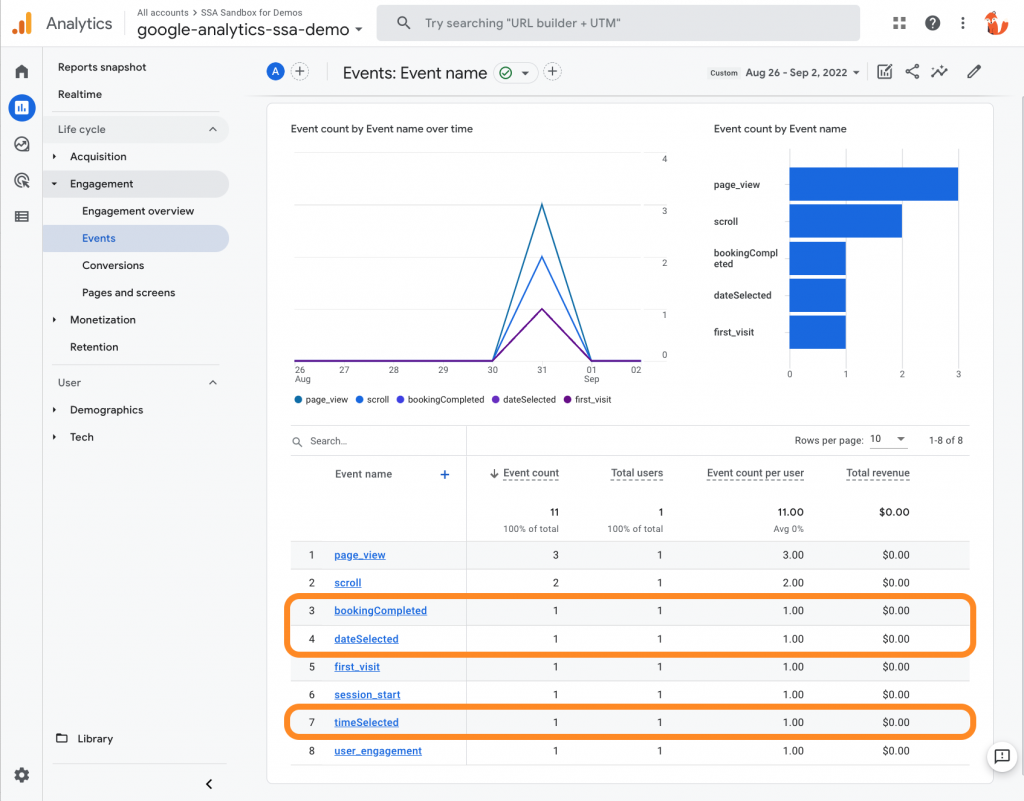
Events View
Another viewing option is to visit Google Analytics > Reports > Engagement > Events. You’ll be able to view various GA4 events here, including bookingCompleted events and other related SSA events.
Conversions View
Lastly, to view the events that you’ve marked as conversions, visit Google Analytics > Reports > Engagement > Conversions. You’ll see statistics that demonstrate which users have completed a conversion event.
Marking an SSA Custom Event as a conversion
A conversion is an event that happens where a site visitor or lead takes an action that demonstrates intent. A conversion can be a purchase, a form submission, or booking an appointment (lucky you!).
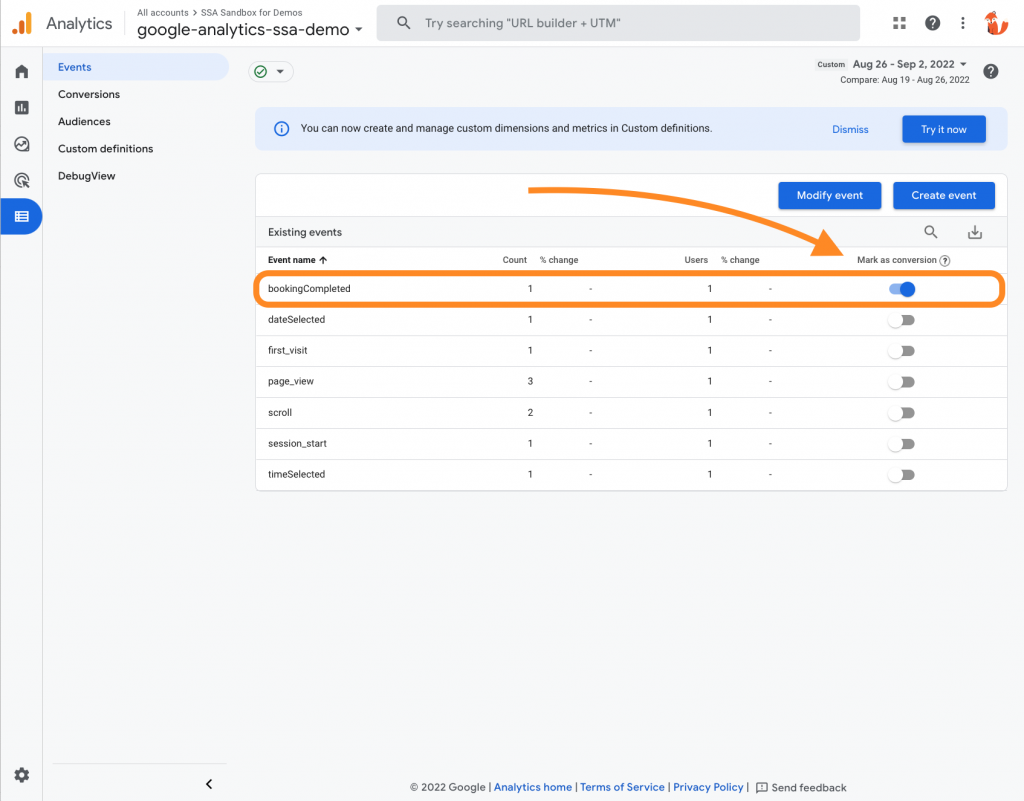
To mark an SSA event as a conversion, go to Google Analytics > Configure > Events. Here, you’ll see the various existing SSA events already configured for you. To mark one as a conversion, simply click the respective toggle under the “Mark as conversion” column.
Find an event that indicates intent, such as booking an appointment. For example, SSA creates an event called bookingCompleted. Find that event and click the switch to mark that event as a conversion.
