In this document:
Introduction
This guide will review some popular Gravity Wiz Perks that work nicely with the Simply Schedule Appointments and Gravity Forms integration.
We’re going to cover the following Perks:
- Populate Anything
- Conditional Logic Dates
- Limit Submissions
- Preview Submission
Visit our Demo Booking Form, where we showcase the Populate Anything perk.
Populate Anything Perk
The fabulous Populate Anything Perk makes displaying live Appointment information from your form or the SSA databases easy using the Dynamic Database Objects and Live Merge Tag features.
Populate Anything Video Walkthrough

Dynamic Database Objects – Populate Choices and Values
Any field that supports the dynamic population feature, such as radio buttons, checkboxes, dropdowns, and text-based fields, can now be automatically filled in with information directly from the Simply Schedule Appointment databases.
This is available for both populating choices and populating values dynamically.
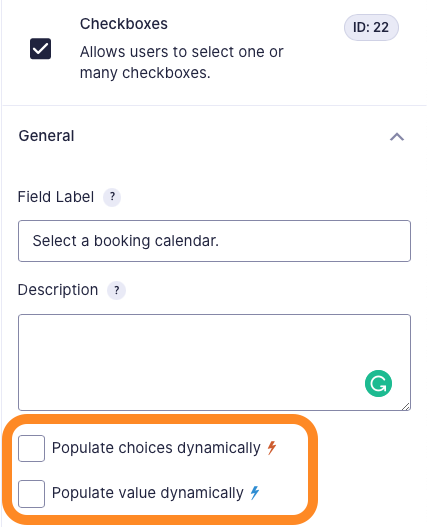
Simply select the Database option in the dynamic population Type dropdown. Select any of the SSA database tables from the Table dropdown. The tables are prefixed with wp_ssa_.
Here are some SSA database tables you can use:
- wp_ssa_appointments: Stores all of the bookings. When a user selects a time slot in the Appointment field in your Gravity Form, it’s stored here.
- wp_ssa_appointment_types: Stores the appointment type information, such as the title and settings.
- wp_ssa_staff: Stores team member information such as their name and email.
- wp_ssa_staff_appointments: Table that stores the relationship between the appointments table and the staff table.
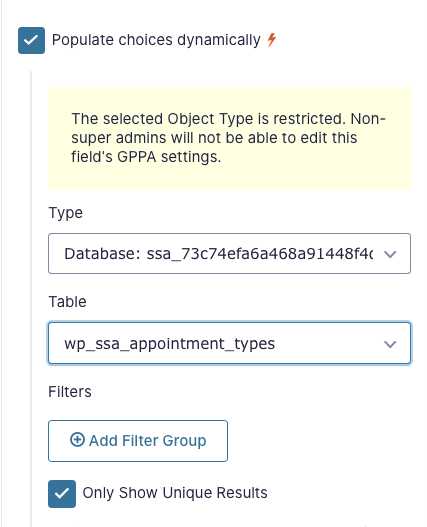
You can also use the Appointment field from your Gravity Form to Filter the results. Each Appointment field returns the Appointment ID; in the database tables, it’s just id.
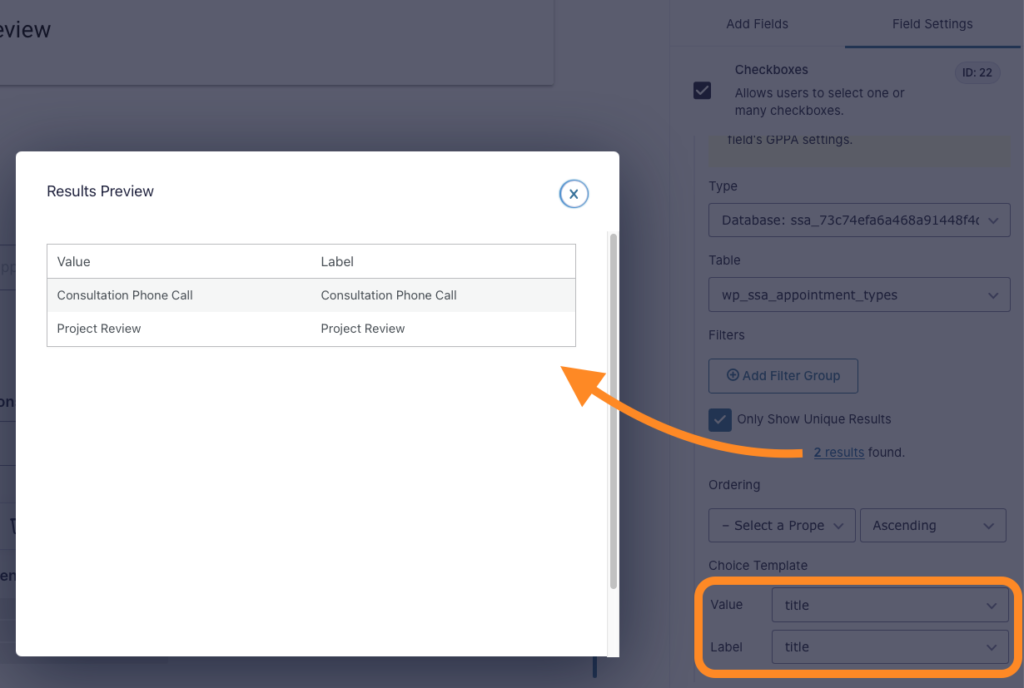
Next, you’ll need to select the Value (and the Label if you’re populating choices) that you’d like to use to populate the field. It will show you the number of results found so you can double-check to ensure you’re retrieving the expected results.
And lastly, you can optionally choose to Order the results you grab from the SSA database tables by a specific property.
To enter a Live Merge tag, simply prefix the SSA merge tag with the @ symbol.
We have a guide listing all available SSA Gravity Form merge tags.
For example, to enter the Appointment Type Title into a Field Label, use this merge tag:
@{FIELD_NAME:FIELD_ID:appointment_type_title}Example Appointment Type Title
@{Book an Appointment:4:appointment_type_title}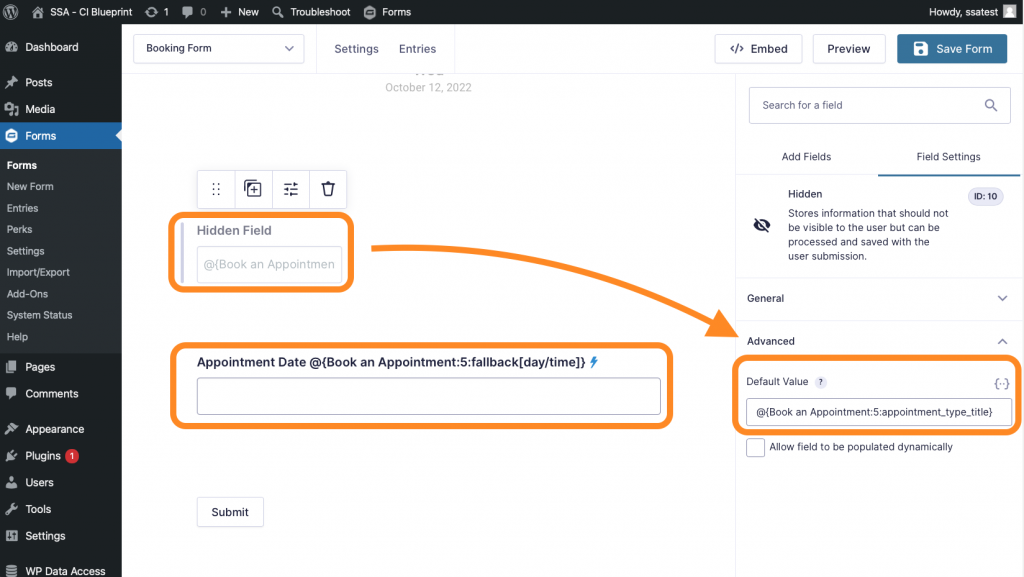
(Optional) Fallback Modifier
The Live Merge Tags feature also includes a Fallback modifier; this allows you to display custom text before the Live Merge Tag is populated.
The Fallback Modifier is only compatible with the plain SSA merge tag; this doesn’t work alongside the SSA modifiers.
@{FIELD_NAME:FIELD_ID:fallback[Please fill in the form]}Conditional Logic Dates Perk
Apply conditional logic to your forms based on the Simply Schedule Appointments booking date or time information with the Conditional Logic Dates Perk.
- Charge additional fees for appointments made on weekends
- Display additional form fields depending on the day of the week
This requires the Populate Anything Perk since we’ll use Live Merge tags.
1. Add a Date or Time Field to your Form
We will use this Date or Time field to store our Appointment date in a format that the Conditional Logic Dates Perk can work with. This will serve as a reference in step 3.
For now, just drag and drop the Date or Time field into your form. We’ll also hide it later.
Date Field
Go to the Date Field Settings > Advanced > Default Value field. Enter either of the following Live Merge Tags.
The Conditional Logic Perk requires the date to be in a specific format. The following merge tags will convert the Appointment start date into the acceptable US date format: MM/DD/YYYY
Customer Start Date
@{FIELD_NAME:FIELD_ID:customer_start_date:format:m/d/Y}Example Customer Start Date
@{Book an Appointment:4:customer_start_date:format:m/d/Y}Business Start Date
@{FIELD_NAME:FIELD_ID:business_start_date:format:m/d/Y}Example Business Start Date
@{Book an Appointment:4:business_start_date:format:m/d/Y}Time Field
Go to the Time Field Settings > Advanced > Default Value field. Switch to the 24-hour Time Format. Enter the following Live Merge Tags into their respective Hour and Minute Default Value fields.
The Conditional Logic Perk requires the time to be in a specific format. The following merge tags will convert the Appointment start date into the acceptable US time format: hh:mm (24 hour)
Hour
@{FIELD_NAME:FIELD_ID:customer_start_date:format:H}Hour
@{Book an Appointment:4:customer_start_date:format:H}Minute
@{FIELD_NAME:FIELD_ID:customer_start_date:format:i}Minute
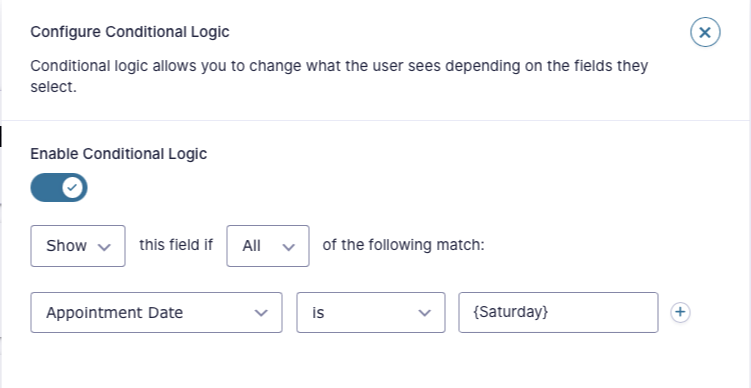
@{Book an Appointment:4:customer_start_date:format:i}3. Use the Date or Time Fields in your Conditional Logic Settings
With our Date and Time fields set up, you can now use them across all your Conditional Logic settings. We’d recommend you visit the Conditional Logic documentation to get a complete overview of all possible combinations.
For example, their Date-based logic supports the following:
- Static Dates (Appointment date greater than 12/25/2025)
- Relative Dates (Appointment date is today)
- Days of the week (Appointment date is Saturday)
- Wildcards (Appointment date is in June)
And their Time-based logic supports Static Times (Appointment time after 1 PM and before 5 PM).
4. Hide the Date or Time Field from Step 1
We can go ahead and hide our Date and Time fields since the user has no use in seeing them.
Limit Submissions Perk
Simply Schedule Appointments has no built-in functionality to limit bookings or submissions. If you need to prevent users from over-booking in your schedules, we offer two workarounds:
- Use the Limit Submissions Perk! The only drawback is that this perk can’t limit the literal availability in booking calendars (ex., Only one submission per IP, no limit on the SSA calendar availability options.)
- Use our mini-plugin to Limit Bookings. The limitation with this option is that this only works for logged-in users and needs a bit of custom coding to meet your limitation needs. (ex. Only one booking per calendar month in SSA.) This works with SSA as a standalone booking form.
1. Create a Limit Feed for Your Form
After Installing the Limit Submission Perk on your site, you should have a new Limit Submission Feed tab in your Form Settings. Start by clicking on Add New.
Now, you can edit the General Settings and Rules for your Limit Submissions Feed.
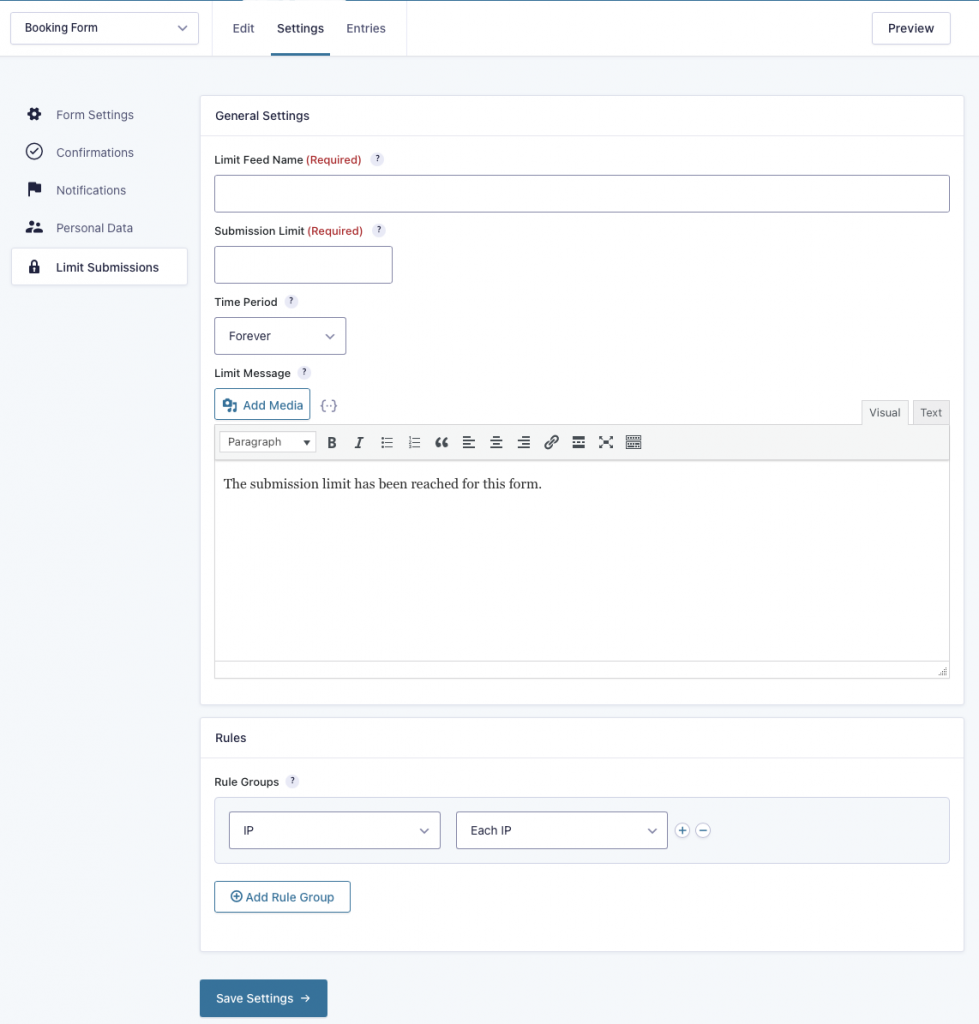
2. Setting up the Limit Submissions Feed
We’ll list a quick overview of all the settings; for a more in-depth explanation of the General Settings and Rules, visit the Gravity Wiz documentation.
Fill in the fields accordingly:
- Limit Feed Name: Name your feed something to help you remember its purpose. Since you can have multiple Limit feeds, keeping the Names organized is best.
- Submission Limit: The max number of entries that can be submitted if all of the rules are met during the Time Period you set.
- Time Period:
- Forever
- Time Period ex. Three days.
- Calendar Period ex. Per month or week.
- Form Schedule configured in the Form Settings > Restrictions, the period where the Gravity Form is active.
- Limit Message: Share some context with the user if they meet the Limit Submission threshold.
- Rules: Specify when the Limit Feed kicks in. You can limit by:
- The user’s IP address
- WordPress user IDs
- URL on which the form was submitted
- WordPress roles, ex. Subscribers, Editors.
- Field Values
Check out their awesome documentation for this perk. It’ll give you more information on how to test with the Limit Submissions shortcode and how to set up Limit Reached Notifications.
Some Additional Notable Perks
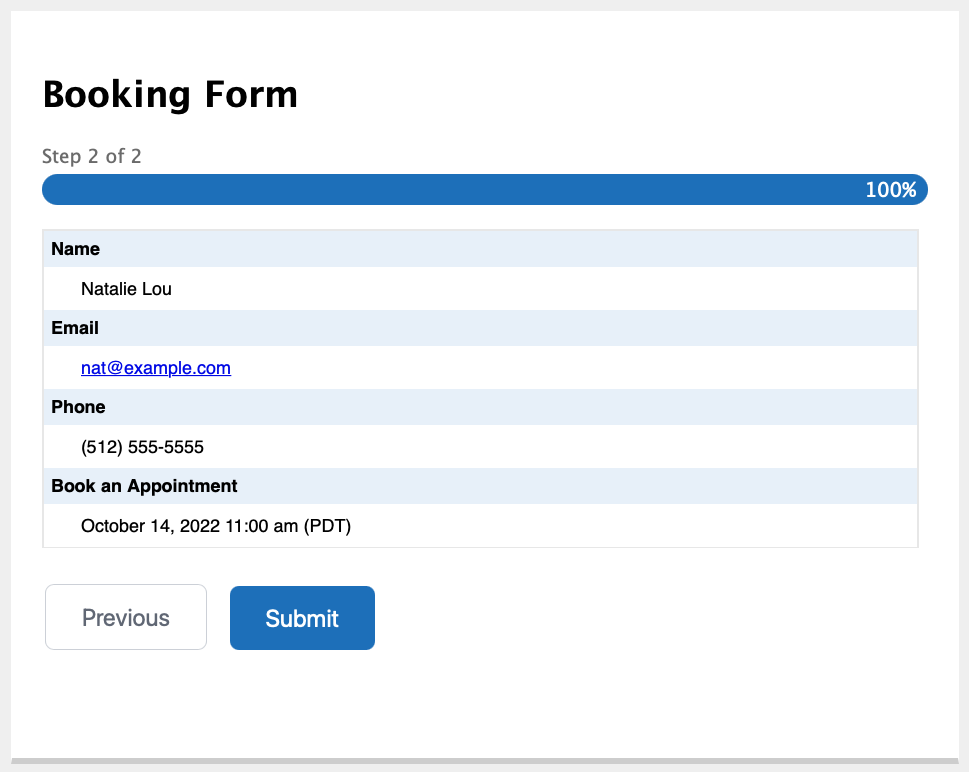
Preview Submissions Perk
We love the Preview Submissions perk because it allows users to review their form entry before submission quickly. And if they spot that they need to make a change, like finding a different appointment time, they can quickly update the fields before submission.
Related Guides
-

MemberPress Appointments for Memberships
-
Appointments Tab for Member Dashboards
-
MemberPress FAQ
-
Let Employees Manage Admin Page