In this document:
- Introduction
- Video Walkthrough of the Entire Setup Process
- Open the Google Developer APIs and Services Dashboard
- 1. Create a New Project
- 2. Searching the API Library
- 3. Creating Credentials
- 4. Last Adjustments to OAuth Consent Screen (Don’t Skip!)
- 5. Collecting the OAuth Client ID and Client Secret and Add to SSA
- 6. Finish Setting Up Your Appointment Types (Required)
Introduction
To start syncing with Google Calendar, you’ll need to collect the Client ID and Client Secret from your Google API.
Our other guide covers enabling and using the Google Calendar Sync with your Appointments and Booking Calendar: Syncing with Google Calendar.
This process changes all the time. We do our best to keep this up to date, but there’s usually no warning or notification that the process has changed.
Guide Last Updated: October 13th, 2022
Video Walkthrough of the Entire Setup Process
Video Last Updated: March 30th, 2022
Open the Google Developer APIs and Services Dashboard
Go to the Google Developer APIs and Services Dashboard.
Make sure you log in to the Google account you’d like to sync with. You may also need to accept the Google Cloud Platform Terms of Service.
1. Create a New Project
Once you’re on the dashboard, create a new project or choose an existing one. Creating a new project may take a moment. You may have to refresh the page to see your new project.
If you created a new project, you can use the following settings:
- Name it “Booking Calendar Sync”,
- and leave the Location set to No Organization.
Google Suite users can proceed with using their organization name as the Location. Can’t click on any organizations? Go to our Can’t Create a Project section.
Go back to the APIs and Services Dashboard.
Alternate Screen After Creating a New Project
If you see this screen after starting a new project, click on the Explore and enable APIs option under the Getting Started section.
Can’t Create a New Project?
Only the domain owner can create a new Google Cloud Platform Project. If you can’t create a new project, contact the domain owner to create the project for you and add you as a collaborator to the project.
Here are some guides to help you get this sorted out:
- Add collaborators to a Google Cloud Project
- Grant a single role to a collaborator for the Google Cloud Project
2. Searching the API Library
Inside the Dashboard, press the button that says Library on the left-side panel. That should take you to the Google API Library.
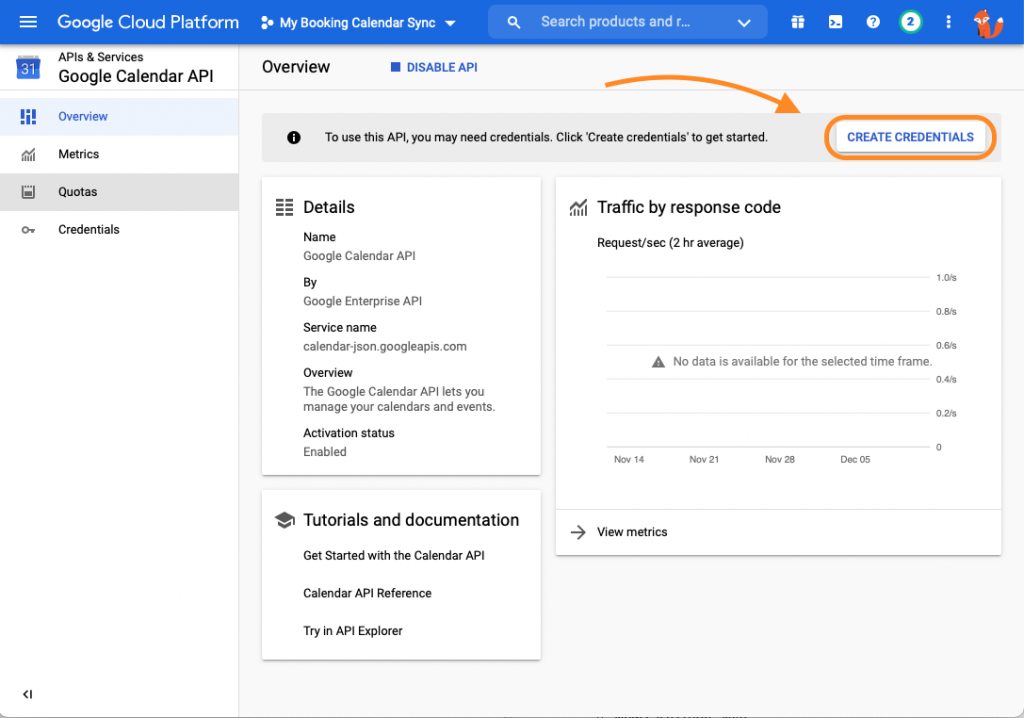
In the Google API Library, search for “Calendar”. Select the Google Calendar API option.
Within the Google Calendar API page, click the Enable button to add the Google Calendar API to your project.
3. Creating Credentials
The SSA plugin is self-hosted, meaning our company never accesses your data. This app is set up as your own, where your website is the host, and you’re technically the developer for this Google App.
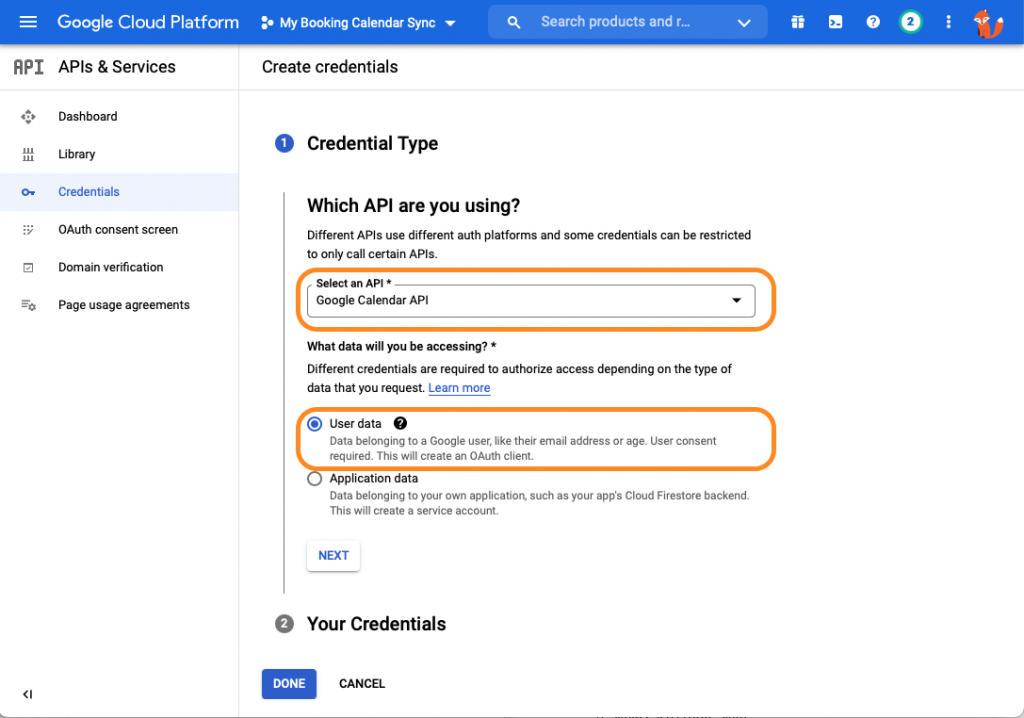
From here, we can start the path to creating the API credentials. Select the Create Credentials button.
3A. Credential Type
Select the Google Calendar API from the Select an API dropdown. A set of radio buttons will appear; click on the User data option. Click Next.
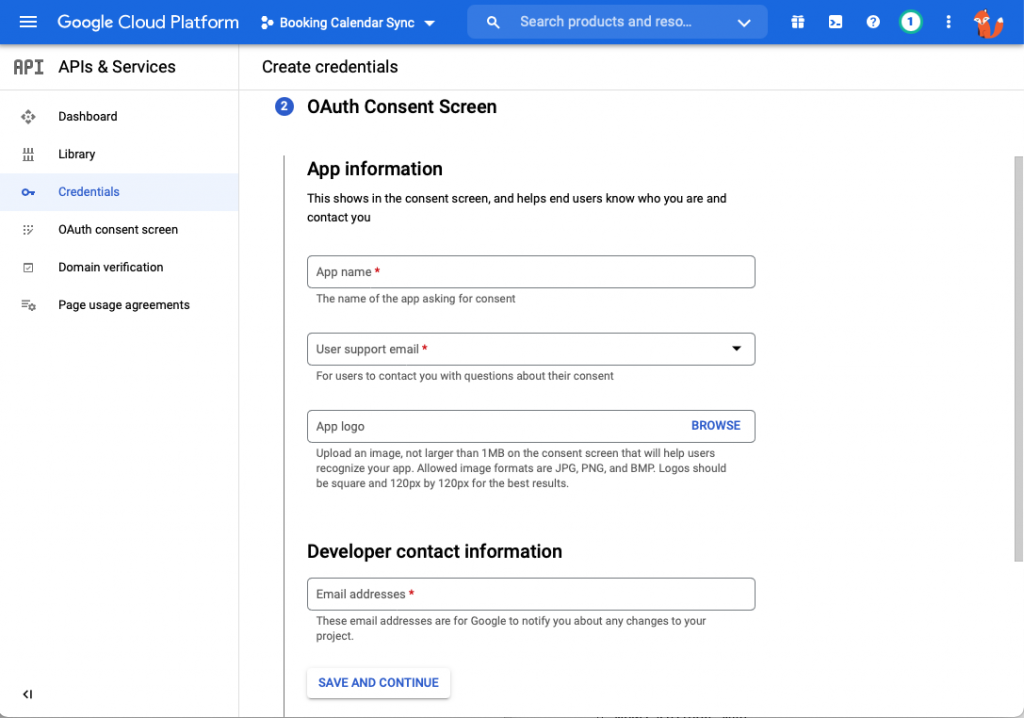
3B. OAuth Consent Screen
Fill in the following fields:
App Information:
- App name: “Booking Calendar Sync”
- User Support email: Use your email address
Developer Contact Information:
- Email Addresses: Use your email address
Click Save and Continue.
3C. Adding the Scope
Select the Add or Remove Scopes button.
Add only the Google Calendar API with the …auth/calendar scope, and use the search filter to search for “Calendar”. After selecting the scope, scroll to the end and choose Update.
Click Save and Continue.
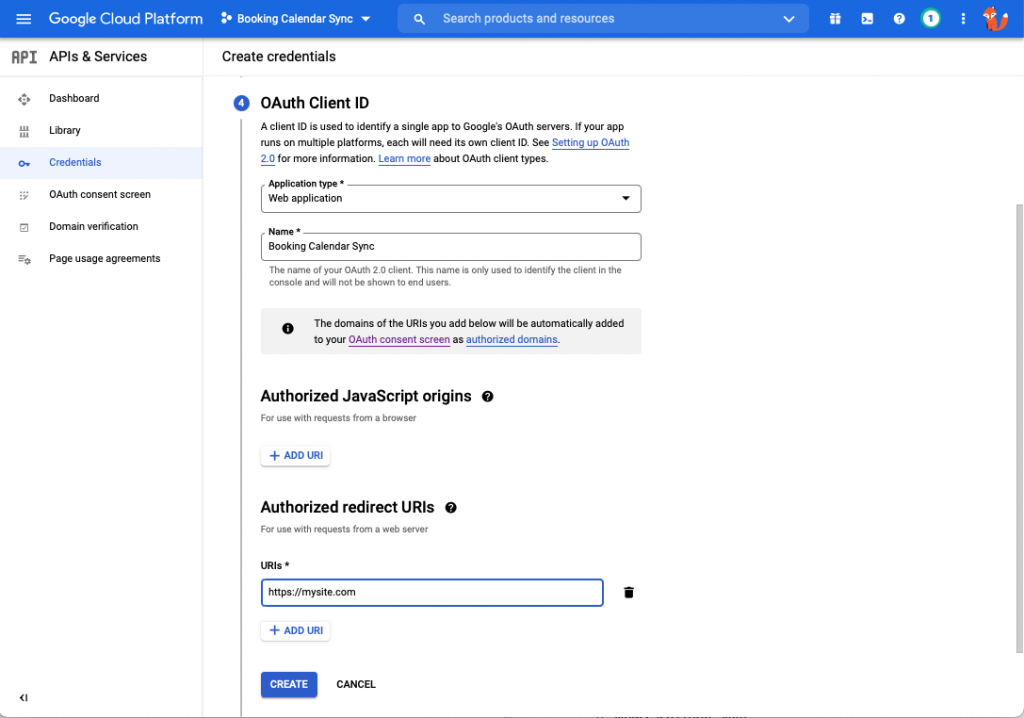
3D. OAuth Client ID Application
Fill in the following fields:
- Application Type: select Web application
- Name: Type in something like “Booking Calendar Sync”
- Authorized redirect URLs: enter your website’s URL with the https:// and don’t include any subdomains.
When you’re done, click Create.
3E. Your Credentials
We don’t have to copy the credentials from here yet; we still need to make some adjustments to our OAuth Consent Screen.
Go ahead and click Done.
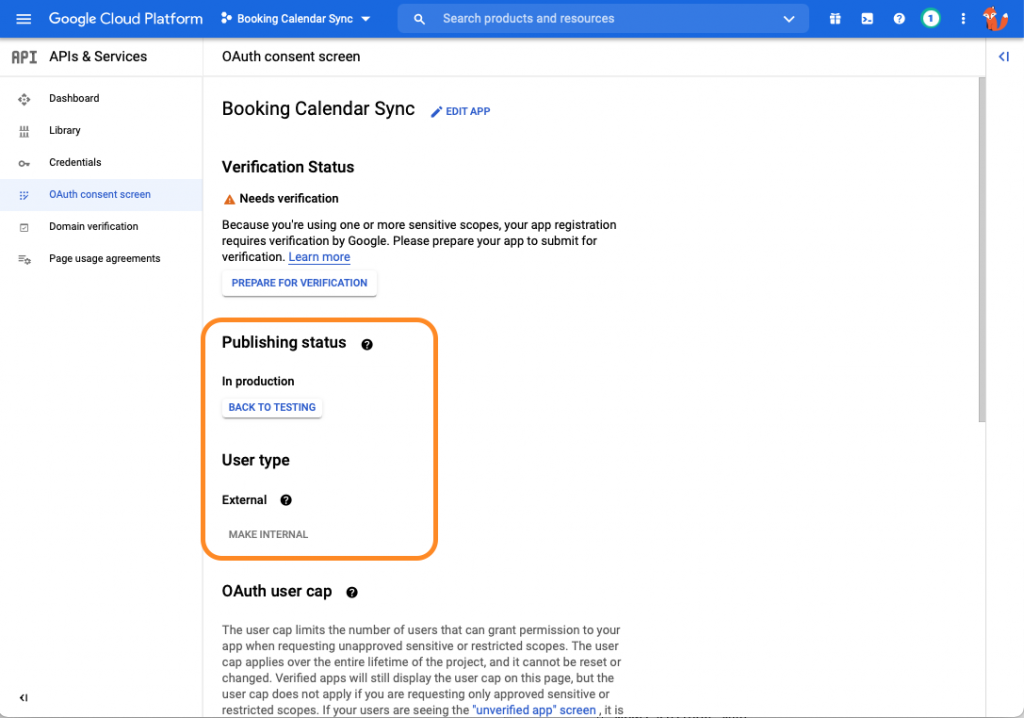
4. Last Adjustments to OAuth Consent Screen (Don’t Skip!)
Select the OAuth Consent Screen tab. We’ll need to double-check the following:
- External vs. Internal User Types
- Publishing Status
4A. External vs. Internal User Type
External vs. Internal, more information here:
- External apps also allow users outside your organization (@your_organization.com) to connect SSA to their personal Google Calendar. Available to any test user with a Google Account.
- Internal apps allow only users within your organization (@your_organization.com) to connect SSA to their personal Google Calendar.
Please select External unless you own a Google Suite or Workspace account and plan to use your custom email address to sync to SSA.
4B. Publishing Status (Only if selected External in 4A)
By default, the Publishing Status will be set to Testing. We need to make sure this is set to In Production. Click on Publish App.
This should show you a pop-up with some warnings. Click Confirm on the pop-up.
Since this is for personal use, you do not have to verify the app or make a Youtube video. YOU DO NOT HAVE TO PREPARE FOR VERIFICATION.
5. Collecting the OAuth Client ID and Client Secret and Add to SSA
Now, we’ll be able to collect the Client ID and Client Secret for the Simply Schedule Appointments sync settings.
Go to Credentials from the left-side menu.
Click on the Client ID Name in the OAuth 2.0 Client IDs table. You should see your Client ID and Client secret in the top-right corner of the page.
Adding the Client ID and Client Secret to SSA
Paste your Client ID and Client Secret to the Google Calendar Sync settings in Simply Schedule Appointments. Click Save and Authorize.
Google will now ask permission for Simply Schedule Appointments to access your calendar. Go through those prompts to accept the permissions.
How to resolve 400 redirect_uri_mismatch errors
Bypassing “This app isn’t verified” message
If you choose the External app type, you may see a screen that says This app isn’t verified. To bypass this, click on the Advanced link and then the link that says Go to yoursite.com (unsafe). That should allow you to see the permission prompts.
Learn more about the “This app isn’t verified” error and why it won’t affect Google Calendar Sync.
6. Finish Setting Up Your Appointment Types (Required)
After you have set up your Google Calendar client ID, your Simply Schedule Appointments calendar syncs with Google Calendar. Now, finish setting up Google Calendar in the Appointment Type settings.
Related Guides
-

Google Calendar Sync
-
Google Calendar FAQ
-
Google Calendar Not Syncing or Checking for Conflicts
-
400 redirect_uri_mismatch Error